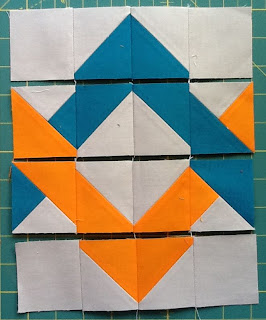
I'm calling it Woven Chevron block (cos I'm so great at coming up with creative names for things!). Why woven? Well, if you put multiple blocks together, you'll get something like this:
That's only four blocks, but you get the idea...
So how to make this little pretty? I used solids for mine (Kona Ash, Kona Orange and Kona Surf) but you could use any combination of solids/prints. I'd probably avoid directional fabrics cos it would be quite tricky to make it all line up.
I did actually take photos for the first part of this tutorial, but then my camera died, and we didn't have ANY batteries around. So you'll have to bear with descriptions for the first part sorry!
Anyhoo, you'll need to cut:
From background fabric (Ash):
* Four 2 1/2" squares
* Four 3" squares.
* Two 3 1/2" squares
From colour 1 (Surf):
* Four 3" squares
* One 3 1/2" squares
From Colour 2 (Orange)
* Four 3" squares
* One 3 1/2" square.
Right. Lets deal with the cross-over squares first (the woven ones). I'm sure these have a proper name, but I'm going to call them cross-over squares cos that's what they are in this block.
1. Take your 3.5" squares (two background and one of each colour). Pair a coloured square with a background square, and draw a diagonal line from one corner to the other on both the background squares.
2. Sew along both sides of the line, 1/4" away from the line.
3. Cut along this line, creating two half-square triangles from each of your pairs (total of four HSTs)
4. Press your seams open (or to the side, I prefer open)
5. Trim your HSTs to 3" squares.
You should now have four HST squares - two surf/ash and two orange/ash.
6. Pair each of your surf/ash squares with an Orange 3" square, and pair each of your orange/ash squares with a Surf 3" square.
7. Draw a line diagonally through each of the solid 3" squares (ie two orange and two surf). When you pair these with it's HST partner, make sure the drawn line runs PERPENDICULAR to the HST line (see below).
8. Again, sew either side of the line, 1/4" away (as per #2) and cut along the line.
9. Press your seams open. You'll end up with eight squares (two pairs of each of those below). You will only need to use the two like that at the top left, and the bottom right.
10. We'll be trimming these to 2.5" squares. First, line up the 45 degree line on your ruler with the long diagonal seam on your block, and trim off the side.
Then turn your square 90 degrees to the right, and line up the 45 degree line with the short diagonal seam, and the 2.5" line along the bottom of the square. Trim this side.
Continue turning your square and trimming until you have a 2.5" crossover square. Repeat for the remaining three crossover squares.
Right, now the tricky stuff is done, we can make the other HSTs.
11. Pair your remaining 3" squares as per the photo. Follow steps 1-4 and make a total of eight HSTs.
12. Trim them to 2.5" squares.
All the preparatory work is done now. So you can lay out your HSTs, background 2.5" squares and crossovers like so:
13. Sew the squares in each row together:
14. Sew your rows together, and you're done! Please ignore my awful points - I promise not to leave these things to the last minute again! UPDATE: this is bugging me so much, I'm going to rip it apart and resew it together. Better block to come (hopefully!) :o)
I hope you enjoyed my tutorial! Thanks again to Jane for inviting me to design a block :o)
xx Jess

.jpg)


22 comments:
Gosh Jess, that's a clever thought out block. I love it. Definitely a must try. I think it would also look with with 2 really colorful print and solid as a background.
This is a very cool block! I think it would also look great with scraps on a white background.
Bomb. Freaking. Diggity. Love it.
Awesome block Jess! I love chevrons!
What Danny said!!! That is awesome, a whole quilt would look incredible!!
This is right up my alley. Thanks a bunch. I love it!
this is terrific!
Love it!!
What a fabulous block and tutorial!!! Your choice of colors is PERFECTION!
I really love that! Thank you for the great tutorial too - I would've never thought of any of those time saving steps either.
Great block! What a creative idea! =D
I'm thinking of hosting a swap. Let me know if you're interested
http://ibescheraldine.blogspot.co.uk/2012/05/sigh-of-relief-and-idea.html
Cool effect! Would look great on a whole quilt
It`s fantastic and love the effect,fabulous!!Thanks for sharing the tutorial!!
Awesome tutorial Jess! Thanks!
I love the block! A whole quilt like that would be really awesome!
I have had a thing just recently on chevron blocks, I can't get enough of them. But this is something again, can't wait to try it. Well done!
This is so clever & great piecing job!
This is brilliant!
This is such an amazing and informative tutorial! Thanks for taking the time to make it! I've pinned it to my "Quilty Goodness" board on Pinterest (with proper credit, of course!). Feel free to follow me if you'd like: http://pinterest.com/lipglass/quilty-goodness/
Thank you so much for this easy to understand tutorial!!
What is the finished size of the block?
I would love to know how to make the turn in a corner to use this design for a border! Love the block.
Post a Comment