Wednesday 30 November 2011

WIP Wednesday: Charmed Prints QAL

I am thoroughly sick of pink! I decided to split my Children at Play blocks into two groups and make two quilts (a baby sized, and a larger single-bedish sized) - I finished the larger one a few days ago and made a matching pillowcase (blog post here). I have quilted one of the doll quilts and its ready for binding - but being typical me, I have started another project before finishing it off... plus I really needed a break from all that pink!

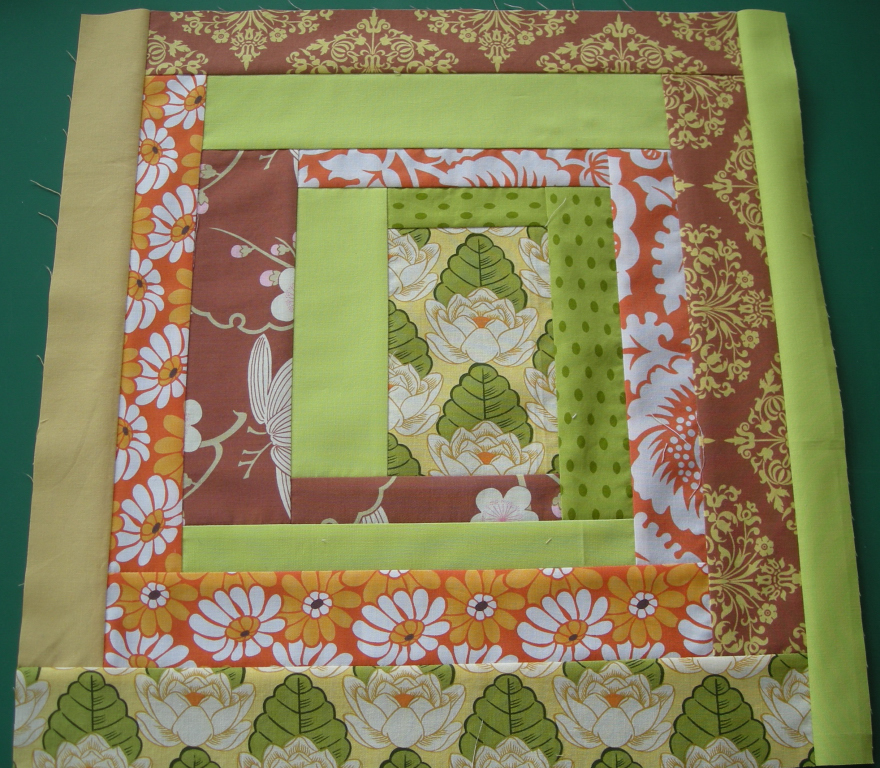
Last night I chose my fabrics and cut my charms for my Charmed Prints QAL quilt - and started making my feature blocks. I am making it for my 8 week old nephew for his first Christmas, so I've deliberately used boyish sorts of colours. I've decided to make a baby sized quilt (with 36 squares) - and I've made two of each of the feature blocks:


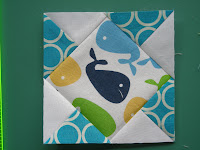
 Some of these photos are shocking - they actually are all pretty square (but need a bit more pressing so they sit flat). I've really enjoyed making them and have a few more sampler-type quilts in mind for my next few projects as I really need some practice with piecing triangles. They all worked reasonably well, except for the pinwheel ones - despite a few efforts they still only measure 4 1/2" instead of 5", so I will pop a narrow border around them before sewing them into the sashing. I have run out of white Kona for the sashing too - so instead of 2 1/2" between each of the square, I'm going with 1 1/2" (I have lots of strips I cut for a project that never happened...) - which will only cut the size down by 5" in each direction so it should still work ok.

This is all my charms laid out ready to sew together:


There's a bit of tufted tweets, some Pop Garden, Saffron Craig, Robots, urban zoologie and the feature squares have a bit of Denise Schmidt fabric I picked up at Spotlight (they are so cool! I wish I had grabbed some more!)

I've decided to do the Summer Sampler QAL (a bit late I know, but I love the look of the blocks!) and I have plans to do a Japanese-style block sampler quilt - and I'll be posting a tutorial for each block as I go if anyone would like to join me? Possibly my first QAL...

No Progress:
*1001 peeps quilt
* Pop garden quilt
* Fandango quilt
* Doll quilts

This weeks stats:

Completed: 1
New projects: 1
In progress: 8

Happy stitching!
Jess

WIP Wednesday at Freshly Pieced

Tuesday 29 November 2011

Children at Play Modern Quilt (and pillowcase!)

If you follow my blog you may recall my previous post where I had made a bunch of blocks using Children at Play... well I thought long and hard about what to do with them (I had 27 in all, each measuring about 12 1/2" square) and decided to make two quilts (one cot sized and one slightly larger). I finished the larger one last night.


I haven't FMQ-ed anything for a while and I had forgotten how much fun it is! I'm hoping to get the baby sized one and my three doll quilts finished in the next few days now that I'm on a roll. And I'm already thinking ahead to my next project (or three... why is it that I can't finish things without planning my next projects?)

And because I had some of the GORGEOUS Children on Parade (and lots of scraps of other bits) I made a matching pillowcase (using this tutorial). I think this will become a regular thing - it came together really quickly and worked really well - and I even did French seams!!!


I'm linking up to {Sew} modern monday over at Canoe Ridge Creations :)

{Sew} Modern Monday at Canoe Ridge Creations

Wednesday 23 November 2011

WIP Wednesday - A Children at Play Week!

WIP Wednesday at Freshly Pieced

I had a major finish this week - my first bigger-than-a-baby-quilt (its about 80" square) and I'm really proud of it! You can check out my blog post for it here.

Once I'd finished that one, I started cutting into my Children at Play by Sarah Jane. I have been busting to get into these fabrics for a few months - but other projects seemed to take priority somehow, and I was trying to decide what to make with them (I got a bit over-enthusiastic and ordered nearly every print in the girl' Children at Play range, as well as quite a few of the 'boy' ones - they are Just. So. Cute). After having heaps of fun with my wonky log cabins for my Autumn Forest quilt I thought I'd keep a good thing going and make some more - well, lots more...

So this week I've made three doll quilt tops, each around 21" square (ish):


And a whole bunch of blocks destined to become a big quilt. The size of these varies a LOT, so they'll all have a white set of logs around the edge before I join them together...


The light pink behind them is my new design wall :-) - although when I went to get felt to do it, the only colour choices were black or light pink, so I went with pink... which makes some of the edges of these blocks disappear (its nearly exactly the same shade of pink).

I'm also going to make a matching pillow case for the quilt, and some tiny doll pillows to go with the doll quilts. I think I'll be well and truly sick of pink by the time I finish these (not my favorite colour! I am so hoping my daughter grow up to love blue and green like I do...)

Other long term WIPs:

1. Excuse the TERRIBLE photo - this is my 1001 Peeps quilt top which is finished (took a LONG time to get this one done - I worked on it very sporadically). I'm just trying to decide how to quilt it - possibly FMQ some largish stars, and then echo quilt around them.... not sure though (ideas would be appreciated :) )


2. Pop garden baby quilt - this has been sitting in my UFO pile for ages. I should probably finish it as its small and will be a quick finish.


3. Fandango baby quilt - when I pulled this one out to photograph it I fell in love with it again, so I might actually get it finished sometime soon as well... excuse the extreme wrinkling, for some reason I had literally shoved it in a bag?!


I am also intending to do the Charmed Prints quilt along (still trying to decide on what fabrics to use) and I am also going to start the Modern BOM over at Sew mama sew - possibly using some my Echo I got last week (SO in love with that fabric!!)

This weeks stats:

Finished: 1!
New Projects: 4? although 3 are doll quilts which are nearly done so not sure they count...
Currently in progress: 4 (7 counting doll quilts)
Wanting-to-start-but-not-enough-time stage: 2

happy sewing!
Jess

Friday 18 November 2011

Celebrate Colour - an Australian Autumn Forest Quilt

I have been sewing like mad to get this quilt finished - from start to finish in about 10 days, which I am quite proud of considering the size (around 80" square)!!!

My inspiration when choosing the fabrics for this quilt was definitely autumn in an Australian forest. While we do have some trees that are deciduous many of our native trees and plants are evergreen, so while there are patches of orange, yellow and red, there is still a strong element of green.


You can see my previous posts for this quilt herehere and here. This quilt was a first in lots of ways for me. My first bigger-than-a-baby-quilt, my first time pulling fabrics from different lines and designers (rather than a single line), my first time using a quilt-as-you-go method and my first time using improv piecing.

My fabric choices for this project were browns, greens, oranges and golden yellows - which happen to be some of my favorite colours as well as shouting 'autumn' to me.


The sashing is mostly Kona ivory - but I ran out and only had enough to sash 13 blocks (whoops!), and didn't have time to order more before the deadline to get this finished... so I used Kona PFD for the remaining 3 blocks and the sashing between the blocks.

I quilted each square (around 19 1/2" square each) in a spiral outwards from the centre block, following the lines of the wonky log cabins.


For some reason, my camera doesn't like the orange-white spotty print and it appears to be much more pink than orange in these shots...


For the back, I had about 3 yards of a print from Amy Butler's Daisy Chain so I cut 8 backing squares from that, and then pulled various shades of yellow-green from my stash for the remaining 8 backing squares. At the basting and quilting stage I hadn't planned the layout of blocks, so layout for the back of the quilt was a mystery until I'd finished putting it together. But I actually think I like the back more than the front...


I love how the quilting looks on the back, and I think the coal-grey binding and sashing works really well with the greens and yellow-greens (I am completely in love with grey at the moment!)


The finished quilt measures about 80" square. I will definitely be sticking to baby quilts for a while after wrangling this one!

This is my entry into the Celebrate Colour competition over at Stitched in Colour.

Tuesday 15 November 2011

Wonky Log Cabin Quilt - Quilting

I finished and sashed the rest of the blocks for this quilt over the weekend, and forgot to take photos of the rest... I also spent a lot (A. LOT.) of time working out how to quilt it. Having only made baby quilts (the largest being 40" x 60") I was a bit hesitant about how I'd go quilting an 80" square quilt - and I didn't want to stipple it or do straight line quilting either. So I decided to try something new and quilt it using a quilt as you go method (using this tutorial).

So I squared the blocks up to 19 1/2" each, and cut batting and backing squares a bit bigger (about 21", just to give myself some wriggle room if the quilting went pear-shaped). I quilted each of them in a similar way to my 1001 peeps doll quilt.


And now I'm joining them together... which may or may not end up being an easy process (but so far so good!)

Wednesday 9 November 2011

Wonky Log Cabin Quilt - Blocks part 1

I have been sewing like a mad woman with these blocks! I've finished 8 since Monday...


 They range from about 15" to 17" (not necessarily square) and I'm going to add off-white sashing around each and then square them up to about 20 1/2". The plan is to make another 8 blocks and make a quilt around 80" square... if I don't run out of strips before then! I have added a couple of fabrics that weren't part of the original plan just to attempt to have enough fabric - I think I will (well, hope!)

I'm linking this to WIP wednesday over at Freshly Pieced :)
WIP Wednesday at Freshly Pieced

Tuesday 8 November 2011

Autumn Colours Tunic

Despite being in the midst of spring here in the southern hemisphere I made this top as part of Celebrate Colour, over at stitched in colour. I have had this fabric (some vintage fabric I bought on etsy I think...) for ages, and was inspired to make something with it for celebrate colour since its such an autumn-ish print.


I used McCalls pattern M6025 (printed in the early 90's) - its actually supposedly a dress, and I guess it could be for some people, although I prefer not to wear a dress that barely reaches the top of my legs... so I'm calling it a tunic top :)


The sleeves are 3/4 length so its pretty perfect for this time of year in Tasmania (although the weather still seems to be fluctuating between summer and winter... it would be nice if it could decide which it is!)

I'm definitely an autumn person when it comes to colour choice (orange, brown and greens) so this round of Celebrate Colour totally appeals to me!

Thanks for looking!
Jess

Monday 7 November 2011

Wonky Log Cabin Quilt - Fabric Selection

My first Block Party quilt is going to be for me. So I've chosen a range of fabrics that are some of my favourite colours - I definitely lean toward an earthy palette of olive greens, rusty oranges and browns so my fabric choices for this quilt reflect that somewhat... I did take a pic of all of these together but it was terrible, so I'm left with the individual ones after I'd cut strips.


Blockprint in orange (Heirloom by Joel Dewberry), orange spot print


Trailing cherries in brown (Amy Butler Midwest Modern), Park Fountains brown (Midwest Modern), Optic Blossom in gold (Midwest Modern)


Full moon polka dot in green (Amy Butler Lotus),  Eggs in grass (Freebird by Momo), Wallflower in olive (Amy Butler Lotus), Trees in Leaf (Just Wing It by Momo)


Kona Ivory, Kona Spring, Amy Butler quilting solid in celery, Kona Cactus, Amy Butler solid in gold, Amy Butler solid in orange.

Some of these were scraps left over from other projects, others were FQs or half-yards. I have cut strips of various widths from each (ranging from 1 1/2" to 3") and have started piecing block - I'm having a ball with it!

Hope you're having as much fun as I am!
Jess

Block Party Project

I recently got Block Party by Alissa Haight Carlton and Kristen Lejnieks and seriously can't put it down. Like I look at it everyday. I don't have a whole lot of quilting books, but this one has changed my outlook on quilting all together - it is such an inspirational book! If you're a quilter interested in modern quilting you should seriously get it (would make a great Christmas present!)

So, I have decided to start an ongoing project using this book. Probably most appealing to me is the fact that its an ideas book rather than an actual quilt pattern book (I do use patterns from time to time, but generally make up my own patterns). I intend to make my own version of most of the quilts and I will be blogging my fabric choices, blocks I make and the finished quilt.

There are a lot of techniques in Block Party that I haven't tried but would like to, so I'm hoping this project will expand my quilting skills a fair bit. In the past I have tended to use a single range of fabrics in a quilt - for this project I will be pulling a variety of fabrics together to (hopefully) make some beautiful quilts.

My first attempt at improvisational piecing was my 1001 Peeps Doll Quilt and I'm addicted - it was So. Much. Fun.

I hope you'll read along as I do this project - I'm really, really excited!

Happy stitching,
Jess

Saturday 5 November 2011

Work in Progress: 1001 Peeps

This quilt is a labour of love. I feel like its taken forever, but now the bulk of the quilt top is done I feel like I'm finally getting somewhere with it. Please forgive the dodgy photos (I couldn't find a good spot to hang and photograph this...) The pattern I'm using for this is Fussycut Framed Fairytales by Kate Conklin - I'm not usually a pattern person, but this one really appealed to me and its perfect for this fabric.


It was fairly time-consuming to fussy cut each pair of blocks, but worth the effort I think.


I'm working on the floating squares border and I'm hoping I'll get the quilt top finished in the next night or two... But I'm really not sure how I'll quilt this one (so its probably going to wait a while me thinks - I need to think of the perfect way to do it!)

happy stitching,
Jess

Friday 4 November 2011

1001 Peeps Doll Quilt

I have been slowly (very slowly) working on a quilt for my daughter using 1001 Peeps by Lizzy House, with Kate Conklin's Fussy Framed Fairytales quilt pattern. I started and finished about four quilts after starting it, but have begun again and am determined to finish it before I start anything else!

I had a few big scraps left over from the fabric and when I saw the doll quilt contest on SewMamaSew, I thought these would be perfect for a doll quilt. I had just received my copy of Block Party (another story all together - but how much inspiration can one book hold? I LOVE it!!) and I was desperate to give a scrappy log cabin block a go - and how much fun is improv piecing? I'm addicted! So Zoe now has a completed doll quilt (but no big quilt...) and I really love it (she does too :) )


I was going to make a few blocks and join them, but got carried away - this is about 20" square.


I had so much fun quilting this - I've decided doll quilts are the perfect way to be a bit more experimental with my quilting - its so much easier to move the quilt around (and doesn't require scrunching metres of quilt up to fit it in!). I quilted this using a variegated pink/purple thread, and spiralled outward from the centre square. I love how it looks, and I'll be attempting it on my big wonky log cabin quilt I am planning...

I'm hoping to have some WIP pics of the big 1001 Peeps quilt up soon (I am really in a purple place with fabric at the moment!)

happy stitching,
Jess

Tuesday 1 November 2011

One Way to Bind a Quilt...

There are heaps of really great binding tutorials out there, but I thought I'd share my method. From the outset I should add I am completely self-taught (via books and blogs) so quilting purists may not agree with my method - but it works for me :) I apologise in advance for a very photo-heavy post!

MAKING BINDING:

I like to make cross-grain binding. I generally cut 2 1/2" width of fabric strips (or 2 1/2" strips from left over fabric if I'm making a scrappy binding). To work out how much binding to make add the length of all four sides together and add at least 15" (this will make extra long binding, but I would much prefer too much than too little!) Divide this by 42, and this will give you how many strips of fabric to cut. I always round up here (so if it's 6.4, I'll cut 7 strips).

I then I cut the end of each at a 45 degree angle, using the line on my ruler.


Once all the strips have been trimmed at an angle, I sew them together using approximately 1/4" seam (as long  as they're sewn straight across the overlappy bits it will work regardless of seam size)


Next, I press the seams flat, and then press them open:


You can trim the excess side bits off now.

And then fold the binding over lengthwise (wrong sides together) and press along the length of the binding:


SEWING BINDING TO QUILT SANDWICH:

I don't pin my binding to the quilt sandwich - I just match raw edges as I go. I leave a tail of about 10" at the beginning, and do a few back stitches to secure the start of the seam.

Keep sewing along until you get almost to the edge of the quilt - stop 1/4" away from the edge of your quilt top. I do this by sight, but you could measure and mark if you prefer - but if you go a bit close its easy to unpick a stitch or two in the next step. Stop you sewing machine in the needle down position.


then turn the quilt 90 degrees, so the binding is running at a right angle to your foot (the 1/4" mark should also line up with the next edge of the quilt):


Backstitch away from the quilt top (I usually have at least 3" of batting and backing around the quilt top to facilitate this step):


Make sure you've backed far enough off that you can fold the binding up:


And then down so that the top is lined up and the raw edges line up:


Then simply start stitching back onto the quilt top using a 1/4" seam allowance as before. Repeat this for all four corners.


To join the ends of my binding strips, I use the great tutorial by Sarah at Fairy Face Designs. It works perfectly every time.

I machine sew my binding at the back, using the reverse method by Marianne at The Quilting Edge.

Hopefully this makes sense!

Happy stitching,
Jess