The other thing with this block is that you can reverse the colours and create a completely different quilt again. There are some examples at the end of the tutorial, along with a few quilts that people have made using this block design. So, without further ado, onto the tutorial!
CUTTING
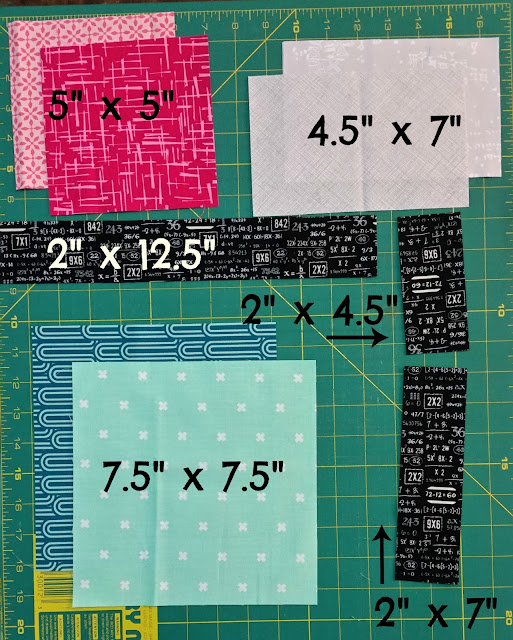
You will need to cut the following fabrics:
For the small HST unit:
- 1 - 5" x 5" square in a light colour (pink)
- 1 - 5" x 5" square in a dark colour (pink)
For the large HST unit:
- 1 - 7.5" x 7.5" square in a light colour (aqua)
- 1 - 7.5" x 7.5" square in a dark colour (teal)
From the neutral fabric:
- 2 - 4.5" x 7" rectangles
From the sashing fabric (black):
- 1 - 2" x 4.5" rectangle
- 1 - 2" x 7" rectangle
- 1 - 2" x 12.5" rectangle
MAKING THE BLOCK
All seams are a scant 1/4" unless otherwise indicated.
Step 1.
Take the light colour 5" square and the light colour 7.5" square, and draw a line diagonally through the centre on the wrong side of the fabric.
Step 2.
Pair the light 5" square with the dark 5" square, and pair the light 7.5" square with the dark 7.5" square. Place each pair of squares right sides together and sew 1/4" either side of the marked line on the lighter squares.
Step 3.
Cut along the marked line, and press your seams open. You will only use one of each of these HST units per block.
Step 4.
Line the seam up along the 45 degree line on your ruler (this works best with square rulers), and trim your HSTs as follows:
- the SMALL HST is trimmed down to 4.5" x 4.5" square.
- the LARGE HST is trimmed down to 7" x 7" square.
Step 5.
Arrange the pieces of your block as shown in the photo below.
Step 6.
Piece the top and bottom rows together, pressing all seams open.
Step 7.
Join the top row to the long sashing strip and press your seam open. Join the bottom row to the other side of the long sashing strip and press your seam open.
I've drawn up a few mock quilt layouts so you can see what sort of secondary patterns you can create with this block. This is what straight set blocks look like (in a 6x6 block quilt).
I was so excited when I saw people starting to choose this block for their hive to make for them, and there are some fantastic examples of what you can do with this block if you search the #checkerblock tag on Instagram. I wanted to share a couple of my favorite quilts, as they're a great way to show you other options with this block.
This first version belongs to Michelle (@chelengeorge on Instagram), who asked her Bee Hive Swarm to make rainbow checker blocks. I think you'll agree this is a spectacular bee quilt :o).
THis second version is one of my all time favorite quilt. Patti (@retiredtoquilt on Instagram) used First of Infinity by Suzuko Koseki (one of my favorite designers!!) and changed around the colour placement which has produced an entirely different quilt. By using white solid for the sashing strips and the HSTs she has created a totally different look. It's nice to see that this block works really well with large scale prints, too!
If you do use this block I would LOVE to see it - please use the #checkerblock hashtag and tag me (@elvengardenquilts) so I can admire your work :o)
xx Jess


