
On to this week's tutorial! This block is called Another Star (weirdest block name ever!).

When I looked at this one I freaked out a bit - but it's actually way easier than I thought. It came together really well - until I was pressing the final seam and burnt it really badly. I will remake that part, but please excuse the dodgy burnt marks on my block (note to self - reduce iron temp back to cotton after having it set on linen!!) I quite like my block - but I think it would look more effective with more of a value difference in the two blues I used.
NOTE: Because of the large number of bias edges you'll be sewing, I strongly suggest starching your fabrics for this one. Paper is easier to sew than fabric ;o)
This tutorial produces a 10 1/2" unfinished block, and all seams are a scant 1/4" unless otherwise noted.
Cutting
This block uses four different print fabrics and background fabric.
Background fabric:

You will need to cut:
* ONE 4" x 4" square (for the centre of the block)
* TWO 3 3/4" x 3 3/4" squares
* FOUR 3" x 3" squares.
Print Fabrics:
This first image shows you where the different prints will be in your block - you could do some really cool effects with value (ie light for A, medium B and dark C).


You will need to cut:
* TWO 3 3/8" x 3 3/8" squares of Print A
* TWO 3 3/4" x 3 3/4" squares of Print B
* TWO 3 3/4" x 3 3/4" squares of Print C
* FOUR 2 1/4" x 2 1/4" squares of Print D
PRINT A:
Cut both your squares diagonally through the centre. You'll end up with four triangles.

PRINT B and PRINT C:
Cut all four squares (two B and two C) on both diagonals - so you'll end up with EIGHT quarter square triangles (QSTs) in EACH print (total 16).

BACKGROUND - cut both of your 3 3/4" squares into quarters as you did for Print B and C (for a total of eight QSTs).

Take one of your Print A triangles, and place the long side along the edge of the square, lining the centre point up with one of the lines you pressed. I forgot to photograph the first one sorry, but hopefully you get the idea! Sew along this seam and press. Take another Print A triangle and place it on the opposite side of the square, again lining the centre point up with your finger pressed line. Sew this seam and press.

Repeat this process with the remaining two Print A triangles. You'll end up with a diamond in a square, measuring 5 1/2". Set this aside until later.

Next we'll be working with the quarter square triangles (QSTs) we cut. Take your eight PRINT C QSTs and all eight of your background QSTs. You will need four pairs the same as the right hand ones in the photo, and four pairs the same as the left hand ones. Sew each pair together and press.


Now, we'll be working with the Print D squares and the Print B QSTs. Take your Print D square and sew a Print B QST (shorter side) to one side of the square as below. Make sure you line up the edges where the arrow is pointing.

Press this seam.

Then take a second Print B QST and orientate it as shown (again aligning the edges where the arrow is pointing). It looks a bit wrong at this stage,

But once the seam is sewn it should line up along the bottom like this:

Now take your background/Print C units you made earlier and arrange them as below.
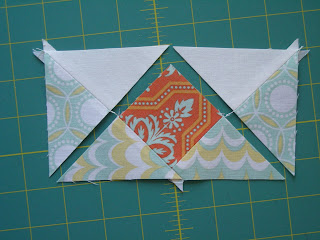
Sew one of the units to one side and press.

And then sew the other unit to the other side and press.

You'll end up with four of these units, each measuring 3" x 5.5". Trim off the dog ears on all your pieces before progressing to sewing the block together (I forgot to photograph mine once they were trimmed).
Lay out your units as shown. Sew the units into rows.

And then sew the rows together.

And ta-da! Another Star is born!

Please let me know if you have any questions at all - I'm not sure how well I've explained some of the steps in this one. As always, please upload your blocks to the Flickr group so we can see everyone's interpretation :o)
Hope you all have a brilliant weekend
xxx Jess

PRINT B and PRINT C:
Cut all four squares (two B and two C) on both diagonals - so you'll end up with EIGHT quarter square triangles (QSTs) in EACH print (total 16).

BACKGROUND - cut both of your 3 3/4" squares into quarters as you did for Print B and C (for a total of eight QSTs).
Putting the Block Together:
Take your 4" x 4" background square. Fold it in half and finger press in both directions as below.

Take one of your Print A triangles, and place the long side along the edge of the square, lining the centre point up with one of the lines you pressed. I forgot to photograph the first one sorry, but hopefully you get the idea! Sew along this seam and press. Take another Print A triangle and place it on the opposite side of the square, again lining the centre point up with your finger pressed line. Sew this seam and press.

Repeat this process with the remaining two Print A triangles. You'll end up with a diamond in a square, measuring 5 1/2". Set this aside until later.

Next we'll be working with the quarter square triangles (QSTs) we cut. Take your eight PRINT C QSTs and all eight of your background QSTs. You will need four pairs the same as the right hand ones in the photo, and four pairs the same as the left hand ones. Sew each pair together and press.


Now, we'll be working with the Print D squares and the Print B QSTs. Take your Print D square and sew a Print B QST (shorter side) to one side of the square as below. Make sure you line up the edges where the arrow is pointing.

Press this seam.

Then take a second Print B QST and orientate it as shown (again aligning the edges where the arrow is pointing). It looks a bit wrong at this stage,

But once the seam is sewn it should line up along the bottom like this:

Now take your background/Print C units you made earlier and arrange them as below.

Sew one of the units to one side and press.

And then sew the other unit to the other side and press.

You'll end up with four of these units, each measuring 3" x 5.5". Trim off the dog ears on all your pieces before progressing to sewing the block together (I forgot to photograph mine once they were trimmed).
Lay out your units as shown. Sew the units into rows.

And then sew the rows together.


Please let me know if you have any questions at all - I'm not sure how well I've explained some of the steps in this one. As always, please upload your blocks to the Flickr group so we can see everyone's interpretation :o)
Hope you all have a brilliant weekend
xxx Jess
9 comments:
It looks great! I have your last 2...now 3 to catch up on! I am working away at my must do list!
what a fab block! I will admit that all those bias edges scare me pantsless though. Did you starch them?
This is great! I hope it will be your block in the Scrappy? bee :-)
Oh thats a beauty :-) Pinning that for later!!
What a great block!!
Awesome.Love your star!!
Such a great looking block! =D
Hi, I've come to stalk you from the out of Africa bee! Some seriously lovely stuff happening here, so glad youare joining us!
sigh! another lovely block. I have it cut out and starched solid. Looking forward to seeing it come together. One question....is there only one of this?
Post a Comment