Tuesday 30 September 2014

Free Motion QAL - Maze Quilting

I'm back this week with another FMQ video tutorial as part of the Free Motion QAL. A huge thanks to all of you who gave me feedback on my first video a few weeks ago - as a complete newbie to this video thing, it was really valuable for me to hear your thoughts on how helpful it was. Your response was overwhelmingly positive - so I will keep these videos coming even once we have finished the QAL :o)

This week I'm demonstrating how I do my Maze quilting design.


I would really appreciate your feedback again this week. I'm not sure how easy it is to see how I'm quilting this design - so if you have any issues with it at all please let me know and I'll do another one. I had a few questions about what fabric and thread combination I'm using on this quilt - the fabric is Cotton Couture from Polka Dot Tea fabrics, and the thread is 50wt Aurifil (colours chosen to blend with the fabric as much as possible).


I realise I've been pretty quiet on the blog over the last few months. I've been working pretty solidly on a string of several (secret) commission projects, but I do have a few finishes I can share with you, so I'll be back in a few days with an actual quilty finish :o)

xx Jess

Wednesday 24 September 2014

A few fabric sales...

I'm a total bargain hunter when it comes to fabric (and anything really!), so I thought I'd share some excellent fabric sales from a couple of my sponsors with you today :o)

Peg at Sew Fresh Fabrics has decided to close her virtual doors after five years running her shop (at first alongside Becca who now runs Sew Me a Song, and more recently by herself). So you can get 30% off the entire store using the coupon code "30OFF".


Peg has some amazing fabrics available, some of which are becoming very hard to find - a few Constellations prints, lots of Melody Miller and many many others!

* Please allow 3-5 days for your order to be shipped.
* International orders may require shipping adjustments

The Fat Quarter Shop is also having a great sale - all Robert Kaufman fabrics are 20% off when you use the code RK2014. This includes Kona solids, Carolyn Friedlander and many more.


Happy shopping ;o)

xx Jess

Thursday 18 September 2014

Decipher Your Quilt - Tessellations

Leanne of She Can Quilt and I are back to writing our Decipher Your Quilt posts after a fairly lengthy break. We only have a few more posts planned in this series, so if there is anything you would like us to talk about that we haven't already covered, please let us know. 

Today Leanne and I will both be talking about tessellating quilt patterns. There won't be much maths to talk about this week, it's more to give you some examples of tessellating quilt patterns so you can identify them.

According to Wikipedia, when we talk about tessellation in geometry, the tessellation of a flat surface (ie a quilt) is the tiling of that surface using one or more geometric shapes (tiles) with no overlaps and no gaps. If you go on to read the rest of the Wiki article on tessellation, gets pretty complex (but it is a really interesting read for those of you who are interested in geometry). My interpretation is that tessellating patterns can be broadly grouped into two categories: regular tessellations and irregular tessellations.

Regular tessellations can only be formed by three shapes: equilateral triangles, squares and regular hexagons (those with six equal length sides and angles). So even a simple patchwork quilt made from squares is a tessellating pattern. 


Even quilts made of more complex quilt blocks are often sewn together as squares - so although each block may be constructed using lots of different shapes, the method we use to join them together employs the concept of geometric tessellation of squares with a regular size.

Equilateral triangle quilts are another common example of a regular tessellation. An equilateral triangle is a triangle that has three equal sized edges and angles - so the angles are always 60 degrees. These triangles are incredibly versatile, and can be arranged to make a huge variety of tessellating quilt patterns. When placed randomly with a range of different fabrics, they appear to be made of lots of triangles - for example these beautiful quilts made by Adrianne of On the Windy Side. In this first example the randomly placed colours make the use of equilateral triangles quite obvious.


But the beauty of these triangles is that they can also form other patterns within the quilt, such as hexagons, like I did in my Beach Ball Baby quilt.


And like Adrianne did in this mini quilt. 


Irregular tessellations can be formed by almost any kind of geometric shape. These kinds of quilt tend to be less common - I think because they normally involve a lot of y-seams and bias edges (not things that are especially tempting in my book ;o)). There are examples of quilts with irregular tessellations though - one beautiful example of an irregular tessellation is this amazing Rose Star quilt by Lucy at Charm About You. Although it uses several different polygons, they all tessellate to form a pattern with no gaps. Lucy paper pieced this quilt


As you can see it uses regular hexagons, and several different quadrilateral shapes (those with four sides). It is a beautiful example of an irregular tessellation I think :o)


Please head over to Leanne's blog to read her thoughts on tessellating quilt patterns - her take on this is a little different from mine, and it is a really great read.

xx Jess


Tuesday 16 September 2014

Free Motion QAL - The first video tutorial!

Welcome to the first video tutorial in the Free Motion QAL! For today's tutorial I decided to show you how I quilt a simple echo design. This is the first free motion quilting design I tried after I'd done stippling for a while, and it was a good introduction into quilting beyond stippling - so I thought it would be perfect for this QAL.

This is the first quilt I quilted using echo shells - using Leah Day's tutorial. You can see my version of echo shells is a bit different from Leah's - and you'll probably find your version turns out a bit differently too.


You can find my Youtube video tutorial here.

In the video I mention that there are other ways you can quilt echo designs. A few examples are a paisley - for example the quilting design in the black area of my groove quilt:


Or a leaf-shape, like I did on this quilt Susan donated for the bush fire appeal last year. 


The possibilities are pretty endless when it comes to echo type designs - and it is a really fun way to fill a space on a quilt.

As a complete novice YouTuber I would really appreciate any and all feedback on this video. I'd love some feedback on whether the angle is helpful, if my commentary is easy to hear - all that sort of thing. Constructive criticism is absolutely invited - but please try to keep it friendly. I am just using my little point and click camera to film this, so the quality probably isn't fantastic ;o)

I will be back in two weeks (and every two weeks after that) with the next video tutorial - so if you're a bit behind you will have plenty of time to catch up :o)

xx Jess

Friday 5 September 2014

Cover Girl!!!

A few months ago, I noticed an ad in a magazine for the 2015 Quilters Companion diary with my Giant Chevron quilt on the cover. I didn't have any idea if it would be the actual cover or not - but then on Wednesday one of my co-workers at Frangipani Fabrics sent me a photo of the diary she'd found at a newsagency. AND IT HAS MY QUILT ON THE COVER!!!!


I'm obviously a wee bit thrilled about this - but as Cath said, wait there's more!!

My Roundabout quilt is Miss April.


Giant Chevron is Miss May.


And Breaking Storm is there - right on the same page as my birthday :oD!! Total random luck, but cool nevertheless ;o)


Forgive me for plastering this all over the interwebs today, but even the newsagent was excited for me - he commented that I was getting in early buying a diary for next year, so I had to explain why ;o) A couple of my Aussie quilty friends have quilts in there as well (Kristy and Jess) which is even better!!

Oh and just a quick note from one of my sponsors - Sew Me a Song is having a sale to celebrate national sewing month. You can take $10 off your purchase of $50 or more by entering the coupon code SEWSEPT at checkout. The coupon is good through until 8th September. 

Have a fabulous weekend!
xx Jess

Tuesday 2 September 2014

Free Motion QAL - Stitching in the Ditch

Welcome to the next installment in the Free Motion QAL. Thanks so much for your patience with me getting this post together, and for being a bit disorganised so far for this QAL - as so many of you pointed out, family always comes first, and it is really comforting to know that I have your support and understanding :o) The good news is that my partner is pretty much better (so long as he doesn't do too much), so I should be on track to keep up with the QAL posts in a more organised manner.


So today I will be talking about stitching in the ditch. I have to admit I very rarely do this before quilting my quilts - I usually do ditch quilting with my free motion foot as I go along (so I stitch along the seam lines as part of my free motion quilting). I am most definitely not an expert on ditch quilting - but I think it has a lot of benefits, especially with a quilt such as the Giant Chevron where the main design element is set on the diagonal, and the blocks are large, and because we will be using a different motif in each of the coloured stripes. The idea behind stitching in the ditch before free motion quilting is that it will stabilise the main seams, and it also allows you to remove a lot of safety pins (if you're a pin baster!) which means you won't have to start and stop as often when you get to the (fun) free motion quilting part. I'll be honest - the main reason I don't stitch in the ditch as a matter of habit is that it is mind numbingly boring, and time consuming, and I'm too impatient to get to the FMQ part. But it really is beneficial in stabilising your quilt top, and will make it less likely that you'll get issues with folds in your backing fabric while you're FMQing. I'm not sure I'm very convincing here - but it really is worth the effort, and it is something I'm going to do more often.

Technically speaking, stitching in the ditch is quilting right in the seams where your fabric joins, and ideally it should mean your quilting stitches don't show. If the seams have been pressed to the side during the piecing process, ditch stitching will involve sewing slightly off the seam line, on the side with just one layer of fabric. If the seams have been pressed open (which is what I almost always do) the stitches will sit right in the seam line where the fabrics meet. Stitching in the ditch should minimise the amount of stitching that shows on the front of the quilt - but I would still advise choosing a thread that will blend as much as possible into the fabric of the quilt top. On a domestic machine, it is easiest to stitch in the ditch with a walking foot, rather than trying to FMQ in the ditch (where you need to have incredible control of the quilt top to ensure the quilting stitches really do stay in the ditch and not waver off to the side).


Most of the time I ignore all this advice. When I quilted my Marcelle Medallion for example, I started by free motion quilting in the ditch in the centre star block and then FMQed the centre star, before moving on to the first border. I'm not too fussy with my ditch quilting, so if a few of my stitches show it isn't the end of the world. I'm pretty sure it's not the way the experts would do it - but it's what works for me most of the time. The main reason I use my FMQ foot in these circumstances is that I much, much prefer using my FMQ than using a walking foot. Having said that, using an FMQ foot for ditch stitching isn't anywhere near as accurate as using a walking foot, as you are much more likely to wobble the quilt when doing it.

If you look closely in this photo, you can see my ditch stitching around the centre blue star does wobble a bit!!

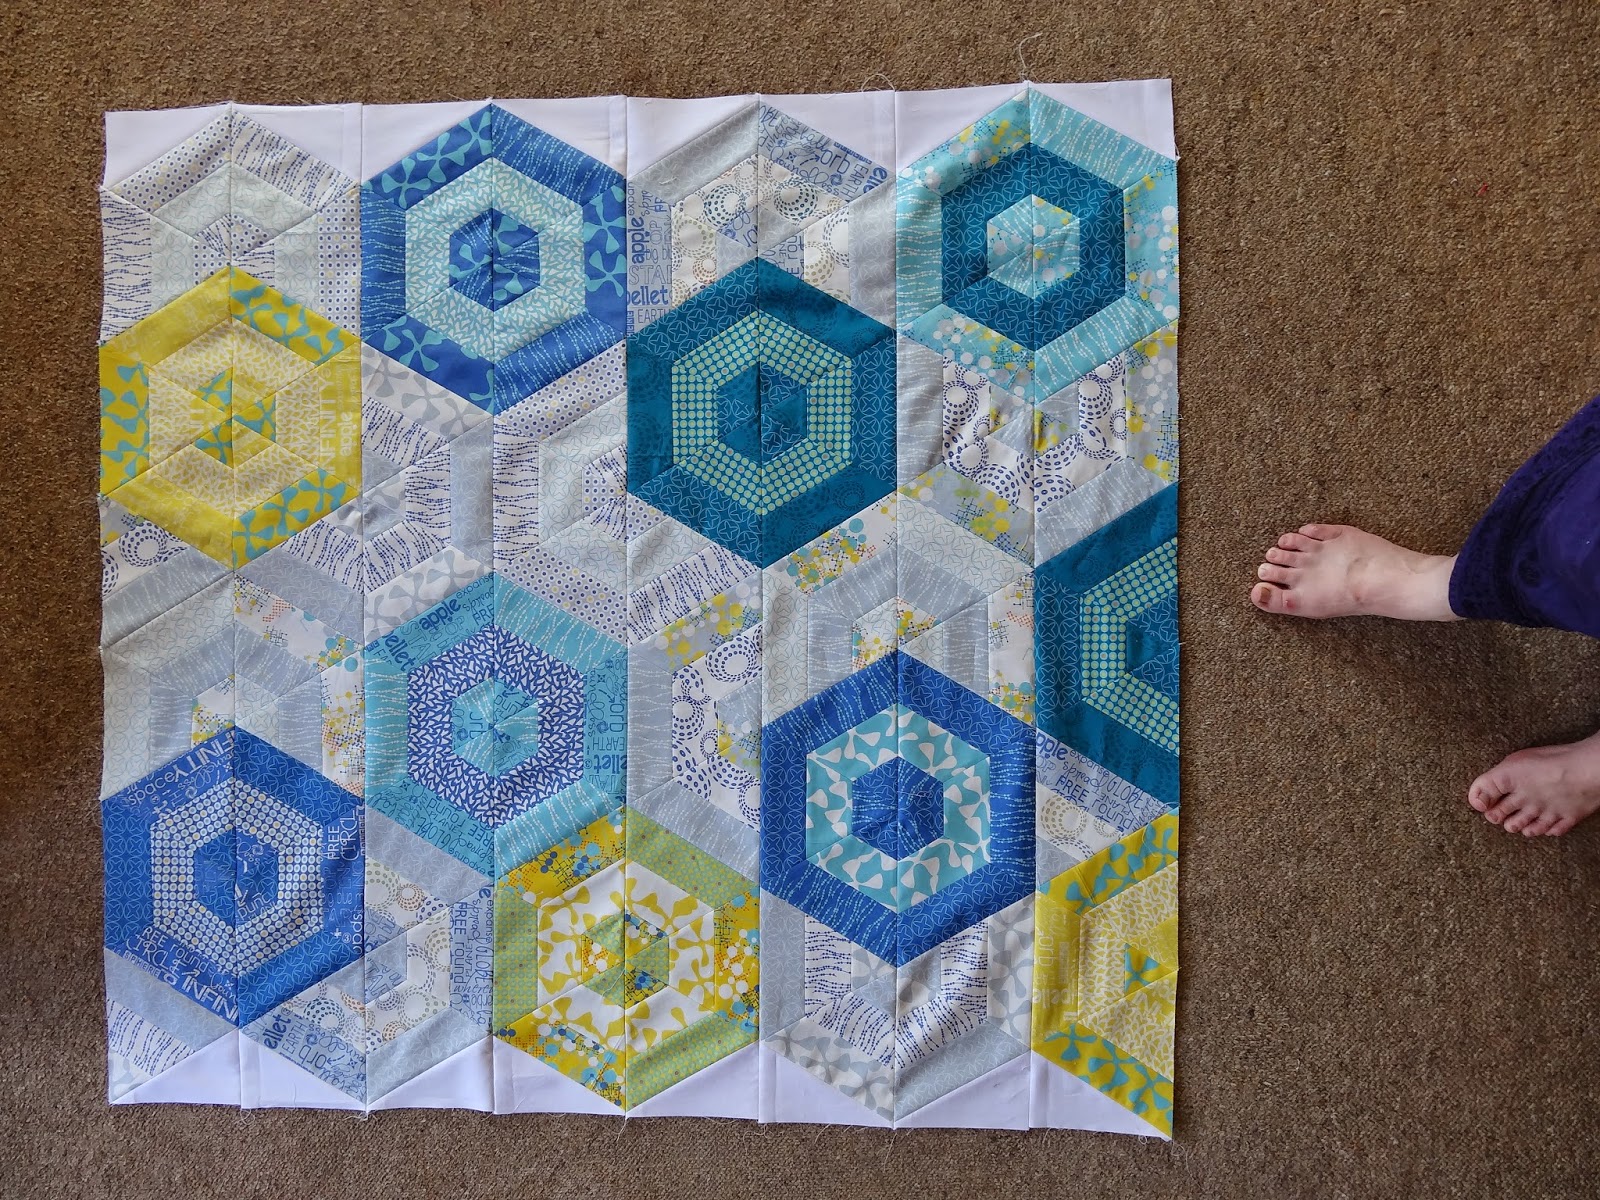
 I have used my walking foot to stitch in the ditch between all the block on my Giant Chevron quilt. I chose to use two different thread colours for my ditch stitching - I initially started out using a light grey Aurifil 50wt thread (Dove grey), but I wasn't happy with how visible the stitches were in the dark charcoal background. This photo isn't the best (the dark grey is much, much darker than this but my point and click camera struggles when photographing dark colours) - but you can probably see that even though these stitches were sitting right in the seam line, the thread shows up a lot against the dark fabric. So I decided to use a charcoal thread in the background, and the light grey through the coloured sections.


Once I was happy with my thread selection, I started quilting in the ditch (just between the blocks) in the coloured stripes. You can see in the photo below, my needle is sitting right in the seam. That's what you want to aim for - and that is why it takes so long. It takes a lot of concentration to keep the seam right where the needle is going, and it isn't something you can rush. When I do this type of quilting with my walking foot, I place my hands either side of the foot, and pull the fabric apart very slightly so that it's easier to get the needle to stitch right in the seam line. Slow and steady! I use a slightly longer stitch length than normal too - I set my machine at about 3.


The stitches are a bit more visible against the navy blue fabric - but I'm confident that once it has FMQ all over it, they will dissolve into the quilt top pretty well. 


You can see that in the lighter fabrics, the thread really does dissolve into the seams, and apart from the odd dodgy stitch (where my concentration obviously wavered!) the stitches are almost invisible. I think a good choice for thread colour is a light neutral if you have mostly light/medium coloured fabrics, or a darker neutral if most of your fabrics are medium/dark in colour.


To start and stop between the coloured stripes and the background, I simply did a back stitch at the beginning of each quilting line. I guess I should be good and bury the threads - but in all likelihood I will just snip them like I normally do ;o) You can see here how much better the charcoal thread works on the background fabric.


I hope you find this a helpful post - if I've forgotten to mention something, please leave a comment here and I'll answer as best I can :o) I'll be back in two weeks with the first video FMQ tutorial, and the real fun will begin :oD

xx Jess

Monday 1 September 2014

Rambling about my creative process...

A few weeks ago, a couple of my very talented bloggy friends (Beth of Plum and June, and Deborah of Sunshine Through the Rain) asked if I'd be interested in participating in the Around the World Blog Hop. It seemed like a fun thing to do (and didn't involve making anything) so I said yes (obvs!). 


It pretty much involves answering a few questions about my creative process, so here goes!

     1. What am I working on?

I almost never work on just one thing at a time - my pile of half made quilts and quilt tops in kind of scary (think 30 minimum). I have just come to the end of an intensely stressful commissioned quilt, which has honestly burnt me out a bit, and I haven't had a whole lot of motivation for sewing this last week. I've mostly been doing computer work, preparing patterns and setting up things for the Tasmanian MQG (first meeting this week, I am SO excited!). 

Having said that, I am semi-actively working on two quilts at the moment. One is for my soon-to-be 10 year old son for his birthday in October (a maths quilt - he's a total maths geek, and mathematical symbols lend themselves perfectly to quilt blocks!!). The other is finishing up a commission quilt for a magazine (and I only have hand stitching the binding to go). I'm planning on starting a Liberty and Oakshott quilt very soon though - some kind of sampler quilt, possibly a Farmers Wife, or possibly from one of my Japanese quilt block books - so my list of works in progress is ever-growing :o) 

     2. How does my work differ from others in its genre?

This is SUCH a hard question to answer. Mostly I don't feel like my work is especially unique - I tend to use traditional quilt blocks (sometimes with my own little twist) in quilts which is certainly not different from what others are doing in the quilt world. And I don't feel like I'm all that adventurous with my colour choices - I really like using a wide variety of prints in each of my quilts, but I tend to use a fairly restricted colour palette (3, 4 or 5 colours). As I'm starting to design more and more of my own patterns, this is something I think about quite a lot - but I'm still not sure what (if anything) makes my quilts differ from other people's work. 

I think where my work might differ from some others is in how I quilt my quilts - I custom quilt almost all my creations on my domestic machine, and try to be as original as I can with my quilting choices - not with the motifs, but my placement of quilting designs. I'm particularly proud of the quilting I did on my Block Flower quilt - I think the combination of matchstitck, straight line and curvy FMQ I did is a bit different from most of the quilting I've seen. 


     3. Why do I create what I do?

I started quilting when my partner was working interstate a LOT, so it started out being my 'me' time of an evening, and it really did help me keep sane while single parenting three kids for long stretches of time. I feel so relaxed when I'm sewing or quilting, it is the best mood-lifter I have ever discovered. As time has gone on, it has become more of an obsession, I guess - and I definitely feel my tension levels rising if I haven't sewn in a few days. I've always enjoyed making things, and the combination of colour, geometry, maths and art that is quilting just fits me perfectly. 

Now though, the biggest reason I make quilts is that I grew up surrounded by handmade (a mum who sewed our clothes and a dad who's a ceramic teacher does that to you!) - and so I love being surrounded by handmade cushions and quilts now. My kids all love snuggling under their quilts, which I absolutely love - each and every one of my quilts has been made to be used - and I'm still convinced our house could do with at least another dozen ;o) The fact that I"m a bit obsessed with designing quilts also helps!!

     4. How does my creating process work?

Most of the time I get an idea, choose a stack of fabric and/or start sketching it out or drawing up the design in EQ7. Rarely will I jump into a project without a good idea of where I want it to go (even my improv quilts have a pretty firm plan when I start them.) Some of these ideas get dumped pretty quickly, but others get me really inspired and need to be made. I try not to start coming up with new ideas if I have loads of projects on the go already - or I find I get a bit overwhelmed and lose interest in all of them. I think my most dangerous period with this is when I get a new shiny parcel of fabric and start getting ideas straight away. This does explain why I have so many half made quilts and quilt tops. 

In the last year or so I've been much better with this - I'm tending to work through a project from start to finish in a reasonably timely manner (months rather than years). I still rarely work on one thing at a time though - it takes a pretty special project to get me to focus solely on that (Sunshine Through the Rain was one such quilt. It's still my favorite ever.)


I also have to admit that if something doesn't start turning out how I'd envisaged, I do tend to have a bit of a tantrum and abandon it (again, the huge pile of WIPs) - but I do often go back to those projects after a month or a year and get them to work.

Thanks so much to Beth and Deborah for inviting me to do this - it has been a really hard post to write, and made me think a lot about why I do what I do. 

I have asked a couple of my friends to be the next hop in these posts. Adrianne (who blogs at On The Windy Side) has an amazing eye for colour and design, and is a constant inspiration to me. She is a fellow Pin-prov bee mate and it has been wonderful getting to know her a bit better through that. I'm thrilled we will get to meet in person next year at QUiltcon too!! Adrianne's post is up today (she has been tagged a few times!) so please head over and check it out!

The other person I've asked is Moira (aka Kettleboiler). Moira has a brilliant sense of humour, and her blog posts are an absolute joy to read. Her honesty and no bullshit approach to her blog is incredibly refreshing - and her quilts are beautiful too :o) 

I'm looking forward to reading the posts from these ladies!
xx Jess