Showing posts with label tutorial. Show all posts

Friday, 9 October 2015

Block #20 Caroline Tutorial - Farmer's Wife Sew Along

Today it's my turn to share a block tutorial with you for the Farmer's Wife Sew Along, hosted by Angie at Gnome Angel. I'll be walking you through how to put together block #20, Caroline.


This block is made up of half square triangles (HSTs) and quarter square triangles (QSTs). I will be walking you through how to put this block together, along with a few tips and tricks for piecing these units so that you get perfect points.

#20 CAROLINE TUTORIAL - ROTARY CUTTING


Step 1 - Cutting


To make this block using the rotary cutting method, you will need to cut squares of fabric.

a. The smaller squares are cut at the size shown on the rotary cutting instructions for Triangle B, but rounded up to the nearest half inch. You will need FOUR squares from one fabric (shown as blue in my block) and TWO squares from two other fabrics (the green and white stripe, and the green and blue stripe shown here). This is a total of EIGHT squares.

b. The larger squares are cut at double the measurement shown for Triangle B, rounded up to the nearest inch.


Step 2. Pair up your fabrics. 


The smaller squares will be paired up as shown in the photo below. The larger squares are paired up together.


Step 3. Draw a diagonal line through the centre on the wrong side of the lightest fabric in all of your six pairs of fabric. 


Step 4. 

a. Sew 1/4" either side of the line on all pairs of fabric, by lining the side of your patchwork foot up along the edge of the line


b. Cut along the drawn line on all pairs of fabric.


Step 5. Press your seams open. 

You will have two large HSTs and eight small HSTs as below. The large HSTs will be used in the quarter square triangle units, and the small HSTs will be used to make pinwheel units.


Step 6. Making the QST units


Take both your large HSTs, and draw a line diagonally through the centre on the wrong side of one of these. Pair them up so that the sewn seams on both the HSTs are lined up and you have different opposite fabrics paired either side of the seam as shown below.


You want to make sure these seams line up accurately along the line, so you get a really nice point in the centre of your block.
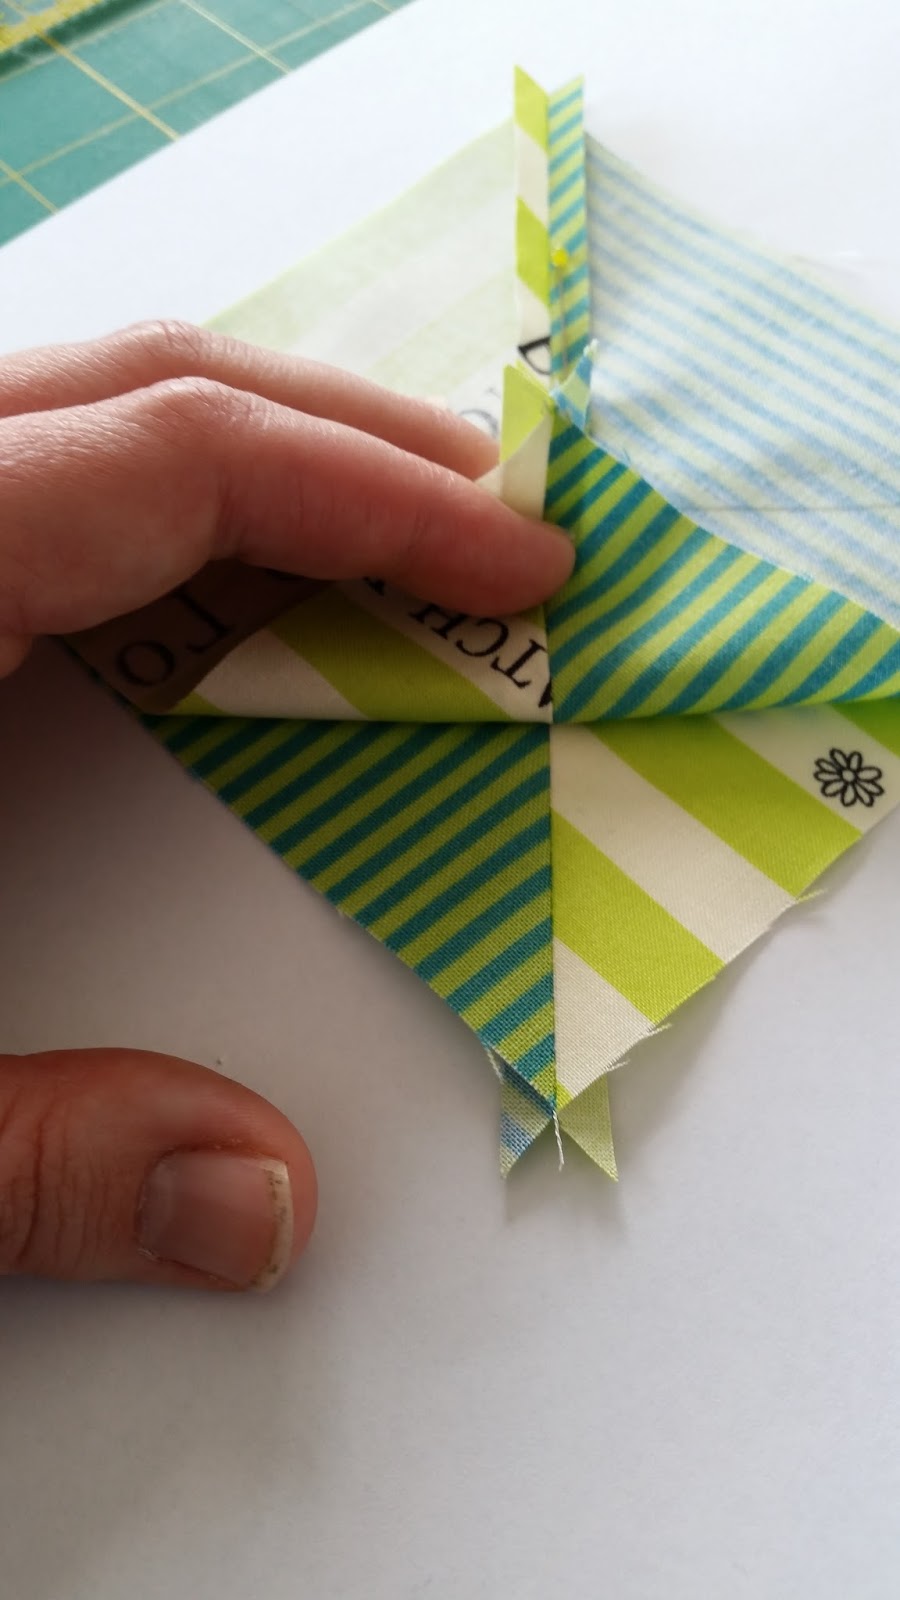


You can use a floating pin to help do this - push a pin exactly through the centre of the top HST.


then carefully lining up the edges of your two blocks, push the pin through the bottom HST, making sure it goes straight through the centre of the seam. 


Pin these together and sew either side of the line. 


 Cut along the drawn line, and press your seams open.

You will need to trim these QST units down to size. Look carefully at the photo below to see which points you will need to line up on your ruler to trim these blocks accurately. When these points are lined up, trim the right hand and top sides of your QST unit.


Turn your QST around so the trimmed sides are at the left and bottom. Follow the photo below to see which points to line up on your ruler, and again trim the right and top sides.


7. Trimming the HST units


Look carefully at the photo below to see where to line up your ruler on your HST blocks to trim them to size. You'll be lining the 45 degree line on your ruler up with the seam on your block. Position your ruler as shown, and then trim the right hand and top sides of your HST.


Turn your block so the trimmed sides are on the left and bottom, and follow the photo below to line up your ruler. Again, line up the 45 degree line on your ruler along the seam. Trim the right hand and top sides.


8. Make the pinwheel units


Take your eight finished HST units and arrange them in pairs as shown below.


 Sew these pairs together. I find by starting the seam at the end where the points join, I get my seams to match better. Press your seams open.


Next, sew the pairs of HSTs into pinwheel units. Pinning the seams as below will help keep the centre points aligned.


If you look at where the seams will match from the side, you can check that they're aligned properly. 


10. Sew your QST and pinwheel units into the block. 
Arrange your QST and pinwheel units as shown below. 


Sew them into pairs, pressing seams open.


 And finally sew the pairs together, using the same pinning technique as shown in step 9 above.
Press you seam open!


I actually made two versions of this block - I am learning so much about fabric placement by making these blocks! I definitely prefer the blue/green version, but I think this red/white version will make it's way into my quilt as well!


This tutorial is part of the Farmer's Wife 1930s Sew Along, hosted by Angie of Gnome Angel and the Fat Quarter Shop.


If you would like to join the sew along, you can find the book here:
The Farmer’s Wife 1930s Sampler Quilt: Inspiring Letters from Farm Women of the Great Depression and 99 Quilt Blocks That Honor Them by Laurie Aaron Hird for Fons & Porter/F+W; RRP $28.99 – Click here to purchase.

xx Jess

Saturday, 18 October 2014

Free Motion QAL - Spirals and a linky party!

Welcome to the third video FMQ tutorial in the QAL! Today I'll be showing you how I quilt spirals. This was a really tricky one to film. I think it's because I'm quilting on such a light yellow fabric, and the light was bouncing off it causing glare, which meant it was really difficult to see what I was doing. It still isn't brilliant I'm afraid - there are still a few parts where it's a bit difficult to see what I'm doing, but hopefully overall it gives you an idea of how I approach quilting spirals. You can find the video here.

I also wanted to show you how much my spirals have changed over the time I've been FMQing. I think my first attempt was on my Groove quilt, back in October 2012. This was the first quilt I tried custom quilting, rather than a simple all-over design, and it was a brilliant learning experience. I still love this quilt, but my spirals (more than the other designs I think) have evolved a lot since this one :o)


9 months (and a fair bit of practice) later, they were more like this. The main change is that I started making them wider spaced and the lines are more evenly spaced, which I prefer (and which is also totally personal.) You might find you prefer completely different looking spirals - where the concentric circles are different widths apart, or the spirals are slightly elongated for example - and these both give beautiful texture as well, so it's just a matter of taste I think.


Another six month jump (this is the end of last year), and I think I was starting to get really comfortable quilting spirals. It does take a while to build up the muscle memory - but once you have it, it takes far less concentration to quilt and make it look like you want it to.


Finally, this is one of my most recent (secret) projects. I'm really proud of the quilting on this quilt, and I can't wait to show you the whole thing :o)


So you can see, practice makes a huge impact on your quilting. I do quilt a reasonable amount (I would say at least one quilt a month at a rough guess) - but even so, I'm quite surprised at how much my quilting has actually changed over the last couple of years. So even if you're not happy with your first few attempts, it's worth persevering, because it does become easier with practice.

If you do have a chance to watch the video, I'd love to hear your thoughts on a few things. Something I'm trying to do in these videos is explain how I plan where I'm going and how I get myself out of corners - is that something that's helpful in a video tutorial? Or should I just quilt and not talk so much? I'm also wondering if the slightly higher angle is better on this one compared to the first two. I really want to keep doing these videos, but I'd like to make them as helpful as possible ;o)

I have forgotten to add a linky party to almost all my posts sorry - but I did remember today, so if you'd like to link up your progress from the QAL, or if you've quilted anything using my tutorials please link up below, and try to visit a couple of the other blogs :o)


xx Jess


Thursday, 20 March 2014

Decipher Your Quilt - Identifying 4 Patch Blocks and Quilts

One of the reasons I'm really excited about running the Decipher Your Quilt series with Leanne is that I really enjoy analysing the geometry of quilts and quilt blocks - so I have really enjoyed my 'research' for this week's post. Leanne and I will both be talking about 4 patch blocks this week; I am talking about how to identify 4 patch blocks and quilts, and Leanne is going to talk about some of the calculations that will help when drafting or re-sizing these blocks. These two topics go hand in hand - it is really important to understand what type of quilt block you are working with before you start re-sizing or drafting any block. So for the next few weeks, Leanne and I will be looking at a whole bunch of different block types, and give you some idea of how to manipulate them.

So, what I will be doing today is showing you a bunch of 4 patch blocks, and explaining why they are 4 patch blocks. I will also be showing you some mock ups of quilts made with these blocks, so you can practice looking for the blocks within the setting of a quilt top. While doing my research for this week's post, I've noticed that 16 patch and 4 patch blocks are often categorised together. For the purposes of this series, we will be covering 16 patch blocks seperately in a few weeks time, but it is worth noting they are very similar in structure.

 I guess the best place to start is by explaining what a 4 patch block is. As the name suggests, there are several 4 patch blocks that are literally 4 equal sized pieces of fabric (or patches) sewn together, such as the simple 4 patch,


the rail fence block,

and the quarter square triangle (or hourglass) block.


Generally speaking though, when we refer to a 4 patch block, it is any block that can be divided into a 2 x 2 grid, with four equal sized sections, such as the grid below.


The simple 4-patch quilt block above obviously falls into this 2x2 grid type, but each of the patches can be more complex than a single square of fabric. For example, the pinwheel block is four half-square triangles joined together in a 2 x 2 grid.


The traditional Broken Dishes block is made of the exact same components (4 half square triangles), arranged differently but still with the 2 x 2 grid layout.


If we look at quilts made from these two blocks, we need to look closely to see which of these blocks it is. This first quilt is made using the Broken Dishes block, arranged in a 6 x 6 layout. 


This second quilt is Pinwheel blocks, arranged in a 6x6 layout, and looks very similar to the quilt above. Having said that, once a variety of colours are used in place of the neutrals, the blocks would become more obvious.


Another 4 patch made with half square triangles is called Birds in Air. Drawn like this, with the horizontal and vertical seam lines marked, it is easy to see how this block is a 4 patch with the 2 x 2 grid visible. 


But if we remove those seam lines it becomes a little more difficult to see that it is a 4 patch - you need to visualise the horizontal and vertical seams through the bottom half of the block. The clue to it being a 4 patch is that on the top and left hand sides of the block, we can clearly see that the block can be divided into two equal sized pieces.


Birds in Air could be constructed using either of the above diagrams; as a 4 patch like the first diagram, or as a variation on a half square triangle like the second diagram. Regardless of how it is constructed it will still be a 4 patch block, since it is possible to superimpose a 2 x 2 grid on the block. When we look at Birds in Air laid out in a 6 x 6 block layout it is pretty easy to 'see' the blocks. 


But, if every alternate block is rotated, it becomes a little trickier to find the blocks among the secondary patterns it creates. If you are looking at a quilt and you're finding it difficult to see the blocks within it, it might be that some are rotated. 


Another group of 4 patch blocks are those constructed from rectangles, such as the blocks below (creatively named Two by Two, Three by Two (also called Roman Stripe Zig Zag) and Four by Two). 


These are all quite simple blocks, but can create some great secondary patterns across a quilt top. My favorite is the Roman Stripe Zig Zag, which creates a really interesting design.


There are several 4 patch blocks that are far more complex than the examples I've shown you so far. Each of these blocks has unusual angles, and would be best constructed using either templates to cut the pieces, or by paper piecing the blocks. Tippecanoe (one of my absolute favorite blocks) is made using four paper pieced units, and because of the angles in the block, it creates the illusion of curves when several of them are joined together. You can find the templates and full tutorial for a 5" finished block here. 


The St Louis Star block is another example of a complex 4 patch. Because of the unusual angles in this block, it is also a paper pieced block (full tutorial and templates available here). 


If you'd like to practice making some 4 patch blocks, I'm going to finish up with a mini tutorial for a Pinwheel cushion (or pillow). This one has been lurking in my UFO pile for a couple of years (which is why there are those huge fold marks across it), and was actually made using off cut triangles from flying geese. It would be the perfect project to use up charm squares though, as it starts with 5" squares of fabric. If you'd like to practice re-sizing blocks, it would also be a good project for that. 


You will need:

* (8) 5" squares of print fabric (pinks and browns here)
* (8) 5" squares of background fabric
* 2.5" strips of background fabric for the border (two strips 16.5" x 2.5" and two strips 20.5" x 2.5")

Make the HST blocks:
1. Using the HST two at a time tutorial, make sixteen HST blocks and trim them to 4.5" square.   
2. Sew the HSTs into 4 patch Pinwheel blocks, measuring 8.5" unfinished. You will have four of these blocks. 
3. Sew the blocks together in pairs, and then sew the two rows together as shown above. This piece should measure 16.5" square 
4. Attach a 16.5" x 2.5" strip to both sides and press your seams. 
5. Attach a 20.5" x 2.5" strip to the top and bottom and press your seams. 

And you're done! You should end up with a 20.5" square cushion cover. 

I hope today's post has been helpful. As always if you have any questions, please send me an email or leave a comment on this post and I will answer as best I can. I would encourage you to head over to Leanne's blog for her post on the calculation side of 4 patch blocks to learn a bit more about these blocks :o)

xx Jess