Tuesday 29 April 2014

That dreaded triangle border

As much as I'm enjoying making my second version of the Marcelle Medallion (designed by Alexia Abegg and found in her Liberty Love book), I must admit I was pretty hesitant about the triangle border after all the dramas I had with it last time. Because I'm teaching it, I wanted to work out an easy way to make this border fit, without the pain of unpicking and re sewing the borders.

This time around, I made my first border a little wider than the pattern's measurements, and cut it down to size once I had my triangle strips pieced together. It has worked rather well - I'm extremely happy with my points, aside from that pesky little one at the top left. I even tried to fix it, to no avail - so I'm going to leave it and hope that it won't be too noticeable when it's quilted. In normal circumstances it wouldn't bother me, but I still hope to enter this in my local (very traditional) quilt show this year, so I'm trying to be as perfect as I can :o)


Because that first border is a little wider than it should be, the whole thing measures slightly bigger than it should - but it won't be too hard to adjust some of the other solid borders to account for it. I'm hoping to be able to show you the quilts my students are working on soon - they are all SO different from each other, but look amazing so far. It is such a fun quilt to teach!

xx Jess

Friday 25 April 2014

For the love of low volume (and Fabriholics Anonymous linky!)

Despite going strong for the last four months of my fabric diet, I must admit I have fallen off the wagon recently. It all started with a slight freak out over my dwindling stash of lower volume (lighter value neutral fabrics), which led me ordering a bunch of prints from one of my favorite shops, Sew Me a Song. I'd forgotten the excitement of waiting for a squishy parcel to arrive ;o)


I'm excited to say that Becca has just listed this bundle in her shop - so if like me you can't get enough low volume and neutral prints, head over and check it out :o)

A few really gorgeous green prints also jumped into my flat rate envelope. I cut into a huge chunk of my green stash for my Ausmod bee mates last month, and was left with a lot of green-yellow prints, but very few deep and bright greens - so these are a very welcome addition to my stash. These prints are Kitchen Pantry in green, Chalkboard in green and Feedsack colour E (which would make the BEST quilt back!)


And just to fill up the parcel, these fabulous Melody Miller arrows jumped in too. I have a major crush on Melody's amazing designs and am hoarding them waiting for inspiration to strike - so it's nice to have some of these to add!


I may have just made another order too - but after these I'm determined to make it until the end of June at least before I order anything else! Honestly, I don't think I'll last much longer than that - I am noticing other holes in my stash (reds and oranges in particular), although I will continue to buy what I need rather than just buying ALL THE FABRIC which is what I've been guilty of in the past ;o)

So, how are my fellow fabric fasters going?


Linking up with Sunday Stash at the fabulous Molli Sparkles!

Friday 18 April 2014

Improvised arrow

This year, I'm participating in a quilting bee that's a little bit different from most. We have two months to make a 12.5" x 60" (or equivalent) improv strip for the queen bee, based on a Pinterest board put together by the queen. The bee members have complete creative control over what they make, apart from the background fabric which is chosen by the queen bee.

Our January/February queen was Gemma who blogs at Pretty Bobbins (and is also FMQ obsessed - you should definitely check out her amazing quilting skills!) and gave us this Pinterest board for inspiration. I really struggled to decide what to do for a long time, but ended up thinking I'd make some improv cross blocks in rainbow colours. I cut my coloured strips, and then at the very last moment decided to try something a little different, inspired by the amazing mini quilt by Lu Summers in Gemma's board.


Gemma's strip

Once I got started, I got a little obsessed with getting it done. I know I say this every time I do improv piecing, but it really was SO much fun to make. I think I need to expand on this idea and use up a tonne of my scraps sometime soon...

xx Jess

Thursday 17 April 2014

Decipher Your Quilt - Identifying 16 Patch Blocks

After an unexpectedly long break from Decipher Your Quilt, we are back this week talking about 16 patch blocks. I'm covering how to identify these blocks, and Leanne of She Can Quilt will be talking about some of the calculations that might be helpful when dealing with these blocks. 16 patch blocks sound a bit scary, but they are incredibly common and you have more than likely made at least several of them if you've been quilting for any length of time.

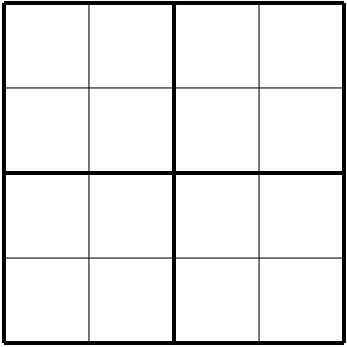
As with 4 patch and 9 patch blocks, 16 patch blocks are identified by the grid you can superimpose on top of them. For 16 patch blocks, the grid type is a 4 x 4 layout.


16 patch grid

16 patch blocks are essentially very similar to 4-patch blocks, and they are often grouped together because of that similarity. A 16 patch is really just a 4-patch block, where each quarter of the block can be further divided into four equal sized squares.


16 patch grid (showing 4 patch)

The simplest example of a 16 patch is (strangely enough) the 16 patch block.


When placed in a quilt, the 16 patch is indistinguishable from a 4 patch - the only difference would be the method in which the block was made. Even then, you could simply join four 4 patch blocks together to make a 16 patch, although AmandaJean has written a great tutorial for making 36 patch block from strips of fabric, that could easily be adapted to make a 16 patch.

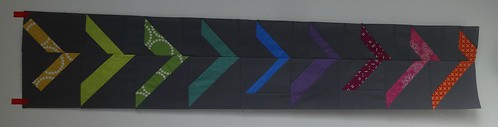
There are an enormous number of 16 patch blocks out there, so I'll just show you a few examples. Some are easy to identify as a 16 patch, such as Clay's Choice which is simply made using squares and half square triangles (tutorial here).


Even placed within a quilt, it is quite easy to see the blocks.


And the Hour glass block, again made using squares and large half square triangles.


It is a little trickier to see the blocks when Hour glass is used in a quilt (it appears to be made of alternating 4 patches and half square triangles), although the secondary pattern of hidden stars is pretty cool.


Many of the 16 patch blocks I've found are simply made using half square triangles and squares in various arrangements (each of the titles for these blocks links to its tutorial).

Pieced Star

Susannah

and Windblown Square


There are also examples of 16 patch blocks that aren't quite so obvious - some of the component that make up the blocks are more complex, and the centre can be set on point which makes the grid type a bit harder to see.

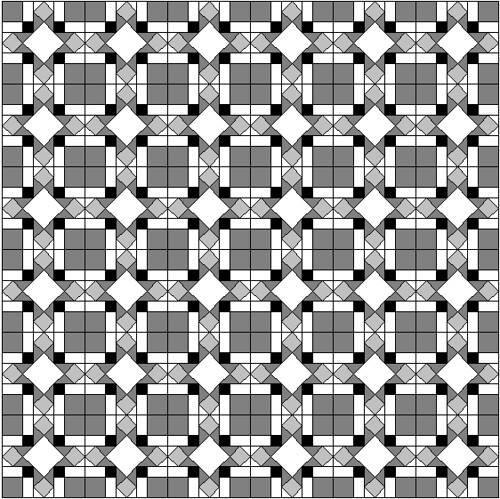
Crown of Thorns is one such example. At first glance it looks like a fairly complex block (and at second glance if I'm honest!) The way to identify it is a 16 patch is by looking at one of the sides of the block - if you look closely you can see each side can be divided into 4 equal parts, so the block can have a 4x4 grid superimposed on it (and hence it is a 16 patch block).

UPDATE: In response to a couple of comments left on this post, I just wanted to clarify that the type of block does not necessarily relate to how it will be constructed. The three examples below (Crown of Thorns, Temple Court and Another Star) are all 16 patch blocks, due to the fact that they can all be divided into 16 equal sized squares in order to calculate the size of each of the patches. As it has been pointed out in these comments, they would indeed by constructed like a 9-patch (three units by three units) but for the purposes of the maths involved in these blocks it is critical to be able to see that they are made up of 16 equal sized squares in a 4x4 layout. If anyone would like me to clarify this further, please don't hesitate to leave a comment or send me an email :o)


It is reasonably easy to see Crown of Thorns set out in a quilt (again it creates a really cool secondary design of interlocking diamonds).


Temple Court is another example of a more complex 16 patch block, and again at first glance it is tricky to identify the block type. As with Crown of Thorns, if you look carefully each side can be divided into four equal parts, so the block can have a 4x4 grid superimposed over it.


Temple Court creates a really interesting design when set in a quilt. My bucket list is getting bigger and bigger as a result of this series!


temple quilt

Another Star is a bit simpler than the two blocks above, but isn't obviously a 16 patch until you look carefully at the edges of the block.


Hopefully I've given you some idea of the range of 16 patch blocks out there - please head over to Leanne's blog to learn about some of the calculations that will help when drafting and resizing these blocks.

One of our readers has asked if we could supply these posts as PDFs so they are easy to print out and keep as a reference, so over the next few weeks Leanne and I will both be converting our posts into PDFs and adding the links to the posts and the permanent page (found at the top of both our blogs).

xx Jess

Wednesday 16 April 2014

Something blue, something new and something take two

After a frantic couple of weeks finishing up my Maple Leaf quilt (which is very well loved I'm happy to say!) I decided to take things a bit more slowly and start a needle turn applique project. I'm entering this year's Umbrella Prints Trimmings Challenge for the first time, and my packet of loveliness arrived last Friday. If you're interested in joining the challenge, you can find all the details on the Umbrella Prints blog (and I'm happy to say I've convinced a few IG peeps to join in the fun!) 


I ordered the blue trimmings, with an idea in mind - and they were perfect for what I had planned, so I jumped in almost immediately (hence the blue and new). I hand-drew tear-drop shapes using a silver gel pen, and then needle turn appliqued them onto very light grey background prints/solids (kind of improv applique if there is such a thing?!?). There are a few really tiny pieces that are too small to applique (they are more of a home dec weight) so I'll add those in when I put the blocks together.


I also finished putting together my Marcelle Medallion V2 centre block and added the first border. It took me a couple of hours to decide on this border print, but I'm really pleased with this choice. I desperately wanted to use it in one of the borders, and because I only had a fat quarter it was now or never.


My kids start school holidays tomorrow, so I'm not sure how much sewing will happen for the next two weeks, but I'll pop in here when I can. 

xx Jess

Linking up with Lee at Freshly Pieced.


Friday 11 April 2014

Maple Leaf Quilt {Finished}

Thanks so much for all your lovely wishes after yesterday's post. My little girl is heaps better today and we managed to get a decent amount of sleep last night, so I'm feeling almost human again today. I also managed to get the Maple Leaf/wedding quilt finished last night, and I couldn't be happier with it. The weather has conspired against me (it is POURING today), but it didn't stop me taking a huge number of indoor photos ;o)

As I mentioned previously, the fabrics I've used in this quilt were chosen quite deliberately. My brother and his finace said they love red and blue, so I pulled a bunch of reds, orange-reds, navy, aqua and green-blues and tried to include lots of fabric that will mean something to them (bikes, tea cups, forest-type images, houses etc). As Charlotte said, it's a bit like an adult i-spy quilt :o)


I wanted to give this quilt some subtle movement with the quilting, so I chose to follow the diagonal created by the leaves and straight line quilt the background (which stabilised the leaves at the same time). The quilting is all free motion quilting - I could probably have used my walking foot for this, but I MUCH prefer doing this type of quilting using my FMQ foot. I find it less boring, and because these were relatively short lines it wasn't too difficult to keep them straight(ish). Any longer, and it involves a bit more quilt wrangling and I get more wonky patches when I need to pause mid line. I find the texture is a bit different too when quilting straight lines using FMQ compared to a walking foot - partly because they aren't truly straight, and possibly because the walking foot flattens it more? I'm not sure.


I didn't mark any lines, but by starting along the edge of the HSTs, I was able to keep them relatively straight. I think the slightly organic straight lines really suit this quilt anyway (although maybe that's just my inner perfectionist making excuses for the slight wonkiness?) A small warning - pulling a quilt diagonally through the machine is a lot more work than straight up and down (which is what I usually do when I FMQ straight lines) and my shoulders are paying for it. I could have rolled my quilt up along the diagonal to do it, but I would have struggled to fit it under my machine, especially for the centre blocks.

Once I'd quilted out the background, I had a bit of fun quilting the leaves. Some of them are quilted using the fabric as a guide, or as inspiration.


A few have swirly, air-current kind of quilting.


I used Aurifil 50wt for all my quilting, apart from the very dark navy leaves. I had a small spool of 28wt Aurifil from a sample pack I won ages ago, and the colour matched perfectly so I had my first experience quilting with a much thicker thread. It was exactly like quilting with 50wt, but the stitches show up much more - I'd love to use it again.


I had a bit of fun with this block - I was thinking topographical map lines when I quilted this one, and I really love how it turned out. Another idea to keep in mind for future quilts!


And I can't seem to quilt anything without at least a few pebbles.


I think my favorite blocks are those with straight lines though (and almost wish I had just done all the leaves like it.)


The back is a really cool HST design fabric I picked up from Spotlight - it felt like the perfect accompaniment to all the HSTs on the front.


Quilt Stats:

* Block - the traditional Maple Leaf block, made at 15"
* Size - 75" square
* Fabric - the background is Kona Ivory, along with various fabrics, including Lush Uptown, Botanics, Architextures, Denyse Schmidt, Tsuru
* Quilted - on my Bernina 440QE

I'm linking up with Crazy Mom Quilts, Free Motion Friday and Gemma's iQuilt linky party!

I hope everyone has a great weekend (and that this rain stops before the wedding tomorrow!)

xx Jess


Thursday 10 April 2014

When something's gotta give

You know those weeks where life throws a few extra balls at you and you just can't juggle everything? That's been my week. Nothing terrible has happened, but between a 3 year old with croup (aka very little sleep for child and parents) and needing to get a quilt finished by this Saturday I haven't had time to even think about my Decipher Your Quilt post. So thanks to my very understanding partner in crime, we will be taking a break from DYQ again this week, and will be back next Thursday to talk about 16 patches. 

On a more positive note, I did finish the quilting on the wedding quilt today and have made the binding, so it's looking like there will be a present finished for Saturday. I couldn't be happier with it (the texture is amazing!), so I'll leave you with a sneak peek and a promise of a full reveal in the next day or two :o)


xx Jess

Tuesday 8 April 2014

FAL Quarter 2 - the list of shame

I did intend on joining in with the FAL last quarter, but just didn't get my act together in time. But I have the best of intentions for this quarter - and I really need to start whittling down my pile of WIPs before I start too many new projects (honest!), so I'm joining in with Katy's FAL 2014.

1. First up, I want/need to get this one finished (by this coming weekend). It is partially quilted, so it shouldn't be too much of a problem to finish it up this week.


2. Marcelle goes Retro - I have only just started this one, but I'd like to try and get it finished to enter into Island Quilts (my local quilt show) so it needs to be done by the 1st June.


3. I've ordered a packet of Umbrella Prints trimmings for the Umbrella Prints Trimmings Challenge - and the deadline for that is the end of May, so it's going on the list.

4 and 5. I'd really like to get these giant star baby quilts done as well - one is quilted and just needs binding, the other needs to be quilted and bound.


6 and 7. These blocks have been languishing for over a year, and rather than make a twin size quilt (which was the original intention as I was supposedly pattern testing for Jess of Sew Crafty Jess. Yeah, that went well.) I'm going to make two smaller child lap sized quilts to sell.


8. I'd like to get my Charming Liberty quilt finished up - I just need to decide on backing and get it quilted and bound. This one is for one of my best friends - we are doing a skill swap (she is an awesome graphic designer/artist and will be designing a logo etc for me).


9. Birds and Bees Colourblock quilt. This is HUGE so I've been putting off quilting it, since it will take a looong time.


10. Mendocino/Oakshott quilt. I really, really want to get back to this one soon(ish).


As tempting as it is to keep adding more onto this list, I'm pretty certain (okay, absolutely certain) I won't get all of these done let alone more. As it is, I'm going with the put almost everything on the list and then hopefully I'll feel motivated to work on at least one at any time.

Linking up with the fabulous Katy.


xx Jess

Monday 7 April 2014

Marcelle goes Retro

Over the next couple of months, I will be teaching a wonderful group of ladies how to make a Marcelle Medallion quilt at one of my local fabric shops, Frangipani Fabrics. I taught my first class on Saturday and although I was ridiculously nervous about it, it was a really fun afternoon. Each of my students has chosen a completely different palette and it is going to be so much fun watching them all grow. Since I enjoyed making the first one so much, I've decided to make a second Marcelle along the course of my classes.

I wanted this second one to be completely different from the first, so I've chosen a really autumnal, retro kind of palette - lots of reds, oranges and yellows along with browns. I'm going to use the really pale blues for my background fabrics, which I think will work quite well. My initial fabric pull looks something like this (although I'm sure it will evolve slightly over the course of making the quilt).


I have partially pieced the centre star - I'm teaching the foundation paper pieced method I used in my first quilt, just to avoid all the y-seams and templates involved in the proper method (and because, you know, I love paper piecing!). Every fabric in here is a favorite, and I'm really excited about where it's heading.


So although this will be left on the backburner for the next week or so while I finish quilting my Maple Leaf quilt, I'll be slowly putting it together over the next couple of months (and hopefully entering it in this year's Island Quilts show - a major first for me.)

xx Jess

Wednesday 2 April 2014

Maple Leaf Quilt Top

I've been a bit obsessed with sewing this quilt top over the last week - nothing like a deadline to get me moving! I started putting the blocks together last Tuesday, and finished assembling the quilt top today - which might be some kind of record for me. My brother's wedding is on the 12th of this month, so I have ten days to get it basted, quilted and bound - it's looking feasible at this point. No danger of the intended recipients reading this either - I have unlinked my Facebook profile from my Bloglovin account so it will still be a complete surprise :o)


I ended up swapping a lot of the fabrics from my initial fabric pull, but the colour scheme is still essentially the same as what I started with. A lot of the fabrics I used are significant to my brother and his fiance (bikes, tea pots, houses, wildlife), and even my boys commented on how many things are in there that they love, so hopefully they will love it as much as I do.

The blocks are 15" finished, so it's a bit of a monster at 75" square. I'm still deciding how to quilt it (inspiration usually strikes as I'm basting, so I'm hoping that will be the case here!) - but I'm pretty sure I'll FMQ straight lines through the background, following the diagonal of the leaves and have a bit of fun using other motifs within the leaves.

So the plan tonight is to get the backing made and get it basted, so the quilting can begin!

I'm linking up with Lee for the first time in months (hosted by my lovely friend Sarah no less!)

xx Jess