This tutorial is for a 10" finished block (10.5" unfinished). As always I have pressed my seam open unless otherwise noted, and all seam allowances are a scant 1/4 inch unless otherwise noted.
Cutting Instructions:
Print Fabrics:
You will need four different print fabrics to make this block.Fabric 1 (centre square) - One 2.5" square
Fabric 2 - Two 4 7/8" squares
Fabric 3 - Four 2.5" squares
Fabric 4 - Two 3" x 5.5" rectangles.
Cut your Fabric 2 squares diagonally in half:
And cut your Fabric 4 rectangles diagonally through the centre - please make sure it is this angle, not the other way (I recut these pieces more times than I'd like to count!)
Background Fabrics:
You will need:
* Four 5.5" x 2.5" rectangles
* Four 2 7/8" x 2 7.8" squares.
Take your four 2 7/8" squares, and cut them diagonally through the centre.
Piecing the Corner Units:
The four corner units in this block are identical - so we'll be making four of these units.
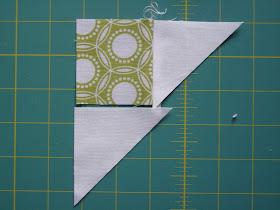
First take your Fabric 3 squares, and sew one of your background triangles to the side as shown, taking care to line up the top edges.
Press this seam open and trim off the little dog ear. Take a second background triangle and place it as shown.
Sew this seam and press it open. You should end up with four of these units:
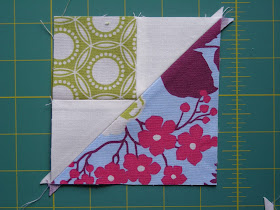
Next take your Fabric 2 triangles and align them as shown:
Sew along this seam and press your seam open.
These corner units should measure 4.5" square.
Half Rectangle Units
These units caused a fair amount of stress. I tried numerous times to get these to work and failed - the only way I can see these could possibly work is by using foundation paper piecing. If anyone knows a better way I would LOVE to hear it!
Now, I don't have templates for you to print so you'll have to draw them up yourself (I am soooo mean!)
You will need to draw four rectangles, measuring 2" x 4" each. THIS DOES NOT INCLUDE SEAM ALLOWANCE!!! So you'll be trimming 1/4" away from the paper later on...
Draw a diagonal line (at the angle shown) through each of the rectangles, and cut them out.
I labelled mine, but that's totally up to you...
Take your Fabric 2 half-rectangle triangle and place it right side up on the back of your template. Take a background rectangle and place it as shown:
Sew along your drawn line, fold back the paper and trim 1/4" away from your seam. Press the background fabric over.
:
Using your paper as a guide, trim 1/4" away from the template.
And you should end up with four units like this, each measuring 2.5" x 4.5":
Putting the Block Together:
Arrange your block units as shown, and simply piece together like a 9 patch.
And a completed Crazy Ann block!
There are two of these in the full Twin quilt - as always please add your blocks to the Flickr group :o)
xx Jess


If your paper pieced fans are 2.5" x 5" unfinished, that does not work with the 4.5" corner units. I have to go play now as my units do not work this way.
ReplyDeleteI think your foundation papers need to be 2" x 4" without seam allowances (2 1/2" x 4 1/2" after trimming with seam allowances included). Just call me your North American insomniac quilt tester - It's 1:30 now and I myst try to go to bed but I've got the two blocks done. If the correction is online before the rest of my American compatriots wake up my chronic insomnia with have some purpose, I guess.
ReplyDeleteOh wow, I'm very happy to look!!!
ReplyDeleteanother gorgeous block! Maybe the half rectangle triangles are how it got it's name ;-)
ReplyDeleteI found block 11 and 13. What happened to Block 12?
ReplyDeleteAnother beauty.This will be the first time I `ll try the half rectangle method.Thanks you so much for the fun!!
ReplyDeleteSuch a great block" thanks for the tutorial!
ReplyDeleteIt's lovely! Thanks gor thd tute.
ReplyDeleteI love this block! I am your 400th follower...found through the BQF!
ReplyDeleteVery helpful! Thanks for sharing.
ReplyDelete