Pages

Monday, 25 January 2016

Slowly, slowly

The first fabric designer I fell head over heels in love with when I started quilting was (like many, many other people) Anna Maria Horner. So I've been gradually building a pretty healthy AMH stash over the last four years or so. I have made a few quilts using Anna Maria's fabrics, but they generally just get gazed at. A lot. Ahem. 

So when Frangipani Fabrics decided to start stocking the paper pieces for Katja Marek's Millefiore quilt along quilt (based on blocks from her wonderful book, The New Hexagon) I decided it was time to take a few deep breaths and make this quilt with my favorite fabrics. Best decision I have ever made - I have never, ever enjoyed putting fabrics together as much as I am in this quilt.


I think one of the things that appealed about AMH fabrics for this quilt (aside from her genius ability with colour) was their fussy cutting perfection. So I've gone a little bit nuts with the fussy cutting; there is a real satisfaction in getting prints to create kaleidoscope effects and I find it is much easier to do it with English paper piecing than machine piecing.


It is such a joy to see these rosettes grow, and see what's going to happen next. No planning ahead, just choosing each round of fabrics as I get to it.


So although it's absorbing most of my nights and it's really not going anywhere fast, it is my happy place at the moment. I kind of wish I could just curate the fabrics and magically have it sewn together - but at the same time I'm genuinely loving the slow pace at which this quilt is coming together.


Have a great week!

xx Jess


Friday, 22 January 2016

Styx - TMQG QuiltCon 2016 Charity Challenge Quilt


Each year as part of QuiltCon, the Modern Quilt Guild hosts a Member Charity Challenge, and my MQG, the Tasmanian Modern Quilt Guild decided to take up the challenge for the 2016 quilt show and collaborate to make a charity quilt. This challenge was open to any Modern Quilt Guild around the world who wanted to create a quilt using a restricted group of colours (primary colours paired with neutrals) and using improvisation with intent to create the quilt design.  

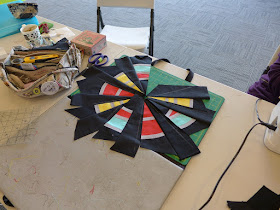
Our talented member and secretary (and very good friend of mine), Kat Jones, was inspired to design a quilt that would reflect a visual aspect of life in Tasmania.  Kat proposed the chosen concept based on the rear view of a logging truck, a familiar sight on Tasmanian Roads. Kat also volunteered to project manage the quilt construction. Without Kat's vision and direction this quilt would not have been born. Kat is honestly one of the most inspiring, innovative and original quilt makers I have ever met. She doesn't blog or have instagram, but you may recognise her name from the QuiltCon 2015 show - Kat took out 1st and 2nd place in the Bias Tape Challenge for her amazing quilts. The way Kat approaches quilt design is unlike anything I've encountered - I've included a few photos of part of her process in this post. 

So, back in September last year we held a guild sewing day where a group of our wonderful guild members spent the day making the logs under Kat's direction. We wanted this project to be a learning experience as well as a project to include all members. They learnt how to make bias binding and machine applique it into place.  Each person created 3 quarters of a circle, each with a number of rings to represent the log growth rings. They then improvised by slicing the quarter pieces into wedges and added alternate wedges of black background in order to form a full log.  To complete the block an oval of black was appliqued in the centre.


We thought improv was perfect for this project as the quilt concept is more effective if each and every block was unique, as no two "logs" are ever the same. Everyone had a fun day making the improv blocks and learning some new techniques along the way. The next challenge was working out how to piece them together; a jigsaw puzzle magnificently solved by the hand piecing talent of Shirley Jeffery (Member) and Kat Jones. Each and every block or partially completed block was included in the quilt layout.


Once Kat and Shirley had finished the monumental task of hand piecing the quilt top, Kat make the back, basted it and handed it over to me for machine quilting. I'm not going to lie - this was one of the most terrifying quilts I've ever quilted. It was an honor to be trusted to quilt it, but I was SO scared I would ruin it, and was also conscious of some very heavy time constraints (it needed to be done smack bang in the middle of what I talked about in this post) so I knew I couldn't do anything over the top complex. So it took me a little while to work out what I wanted to do with the quilting. 

When I'm planning how to quilt a quilt, I always try to choose FMQ designs that complement the quilt design or help tell the quilt's story. Since this quilt was (to me) about something I feel strongly about (logging of old growth forests) I decided to be a wee bit political with my quilting choices. Rather than continue the logs into the background (my initial thought for the quilting), I quilted wedges (aka saw blades) cutting through the logs. The centre of each log, and the areas between the wedges are concentric ovals, inspired by the concentric rings found in tree trunks. It isn't my most stellar quilting, but overall it really works - and since it's charcoal thread on black it really blends into the quilt anyway ;o). This is a glimpse of my ghetto sewing space and the quilt being wrangled in my machine - it's about 90" x 80" so there was a LOT of wrangling involved!


Once I'd finished quilting it, I handed it back to Kat so she could add some hand quilting detail in the logs. It is the perfect finishing touch, and makes me wish I had the patience to add hand quilting to some of my quilts!


To complete the concept a label was made by Jo Chandler (our Treasurer) and Kat to represent a number plate using bias binding and hand embroidery that you would see if following a log truck on our Tasmanian roads.


Our TMQG members were asked to suggest names for the quilt and the name "Styx" was settled upon as it references the old growth forest conservation area of the Styx Valley and Styx River in south west Tasmania. Our president Helen Stubbings has organized for our quilt to be auctioned at annual ball of Colony 47, a local Tasmanian charity,  to raise funds to support their work in providing housing to over 15000 children, young people and families every year.  

And this is the final, epic, amazing quilt. I really can't thank our members who participated in making this quilt enough (especially Kat, who put in countless hours of work to make this quilt possible). I am so proud that this example of our guild's work will be hanging in Pasadena at QuiltCon 2016 for the QuiltCon Charity Quilt Challenge


xx Jess

Wednesday, 20 January 2016

The Farmer's Wife 1930s Block Tutorial - #40 Grandmother

Welcome to the next tutorial in the Farmer's Wife 1930s Sew Along, hosted by Angie of GnomeAngel and sponsored by the Fat Quarter Shop and Marti Michell

Today I'll be showing you how I put block #40, Grandmother, together. This is a pretty simple block to make - I used a combination of paper piecing and rotary cutting for this one, and it was a pretty quick block to put together. 


I used Marti Michell templates (N80, N79 and B13) for a lot of the cutting for this block, but almost all the pieces can be cut using the rotary cutting instructions found on the CD that comes with The Farmer's Wife 1930s book. I have to admit I have become a real fan of these templates - having the cut away corners makes it so easy to align the pieces of fabric and get perfect points (and no I'm not being paid to say that - it is my honest opinion!) I chose to paper piece the section shown below (D1/D2) as I felt this would be the most accurate way to piece this part of the block. 


So, let's get onto the cutting instructions. This block uses three different fabrics, so I'll take you through each fabric one by one. 

CUTTING FABRIC 1 - 'background'

  • Cut one 40A triangle 
    • (rotary cutting instructions found on the CD, or using template B13). 
  • Cut one 40G triangle 
    • (rotary cutting instructions found on the CD). 
  • Cut one 40E and one 40F 
    • you can cut these using the templates found on the CD OR see below...


If you have access to Marti Michell templates, you can use template N80 as shown in the photo below to cut both 40E and 40F. Alternatively, you can use the templates found on the CD to cut these pieces.

  • Cut two strips 1.5" x 4.5", and 
  • Place N80 at one end of the strip, carefully aligning the top, bottom and side edges.
  • Cut off the corner of the fabric
  • TAKE NOTE OF THE ANGLE YOU ARE CUTTING - 40E AND 40F ARE CUT AT OPPOSITE ANGLES. 
  • I highly recommend laying out your pieces as shown above to ensure you are cutting the correct corner off these strips.  


Cutting Fabric 2 - Main 'basket' fabric

  • Cut 2 40B squares (using MM template N79 or using rotary cutting instructions found on the CD)
  • Cut 4 40C triangles (using MM template N80 or using rotary cutting instructions found on the CD)
  • Cut one 40D piece either using template found on the CD, or cut a strip 2" x 4" to place on paper piecing template in position D2. 


Cutting Fabric 3 - minor basket fabric

  • Cut 3 40B squares (either using template N79 or using rotary cutting instructions on the CD)
  • Cut 1 40C triangle (either using template N80 or using rotary cutting instructions on the CD)

Piecing the bottom right corner - using paper piecing template

Take your 40A triangle and place it wrong sides together on the back of the paper template, carefully aligning the sides with the dashed lines around the template. It should overlap the D1/D2 seam line by 1/4". 


Take your 2" x 4" rectangle and place it right sides together with 40A. See the photo below for what it should look like. You can see the 40A triangle fits exactly behind D1 and allows you to line up the D2 piece with ease. Sew along the D1/D2 line (using a shorter stitch length than usual), press the piece across.


Trim all around the paper pieced section on the dotted lines. It should look like this.


Next take one 40C triangle from the secondary basket fabric and place it right sides together with the paper pieced section. If you are not using Marti Michell templates, you can finger press both sections to find the centre of the sides you are sewing together and line them up that way.


Press this seam (I pressed open). And now you're ready to lay out the next components of this block.

Arrange your 40B, 40C, 40E and 40F pieces as shown below. I find it helpful to keep them in this orientation while sewing to avoid mixing up the angles.


Sew the 40B and 40C pieces into rows as shown, pressing seams as desired (I pressed open). 


Join the pieced 40B/40C strips to the 40E and 40F pieces. Press open.


Now we are ready to place the last 40B and 40C pieces down.


Sew one 40C triangle to the top of the 40B square and press open.


Place the second triangle right sides together with this unit, as shown below. The bottom straight edge of the triangle should align with the bottom edge of the square. Sew and press.


Now all the block components are pieced, it's time to join them all together!


First, sew the top and bottom rows into pairs as shown below.


Then, piece the bottom and top rows together. And now we are ready to add the final piece, 40G.


And there you have it, a completed Grandmother block!


If you would like to join in this sew along, the book we are making the blocks from is shown below :o) 


The Farmer’s Wife 1930s Sampler Quilt: Inspiring Letters from Farm Women of the Great Depression and 99 Quilt Blocks That Honor Them by Laurie Aaron Hird for Fons & Porter/F+W; RRP $28.99 – Click here to purchase.

xx Jess 

Thursday, 14 January 2016

Checker Block (a quilt block tutorial)

 Last year one of my quilty BFFs, Alyce aka Blossom Heart Quilts asked me if I'd like to design a quilt block for her Bee Hive project. The aim of the Bee Hive was to design a series of quilt blocks that create a secondary design, and thus lend themselves to being perfect bee blocks - so I said I'd love to. From the outset, I wanted to design a really simple but effective block, one that would be achievable for beginner quilters (and fast and fun for more experienced quilters) but still create a really interesting quilt. The result was Checker, a very simple block to put together, but one with almost endless possibilities in terms of colour and block rotation.


The other thing with this block is that you can reverse the colours and create a completely different quilt again. There are some examples at the end of the tutorial, along with a few quilts that people have made using this block design. So, without further ado, onto the tutorial!


CUTTING

You will need to cut the following fabrics:


For the small HST unit: 

  • 1 - 5" x 5" square in a light colour (pink) 
  • 1 - 5" x 5" square in a dark colour (pink) 

For the large HST unit:

  • 1 - 7.5" x 7.5" square in a light colour (aqua) 
  • 1 - 7.5" x 7.5" square in a dark colour (teal) 

From the neutral fabric:

  • 2 - 4.5" x 7" rectangles 

From the sashing fabric (black): 

  • 1 - 2" x 4.5" rectangle 
  • 1 - 2" x 7" rectangle 
  • 1 - 2" x 12.5" rectangle  


MAKING THE BLOCK
All seams are a scant 1/4" unless otherwise indicated.

Step 1. 

Take the light colour 5" square and the light colour 7.5" square, and draw a line diagonally through the centre on the wrong side of the fabric.


Step 2.

Pair the light 5" square with the dark 5" square, and pair the light 7.5" square with the dark 7.5" square. Place each pair of squares right sides together and sew 1/4" either side of the marked line on the lighter squares.


Step 3. 
Cut along the marked line, and press your seams open. You will only use one of each of these HST units per block.


Step 4.

Line the seam up along the 45 degree line on your ruler (this works best with square rulers), and trim your HSTs as follows:
 - the SMALL HST is trimmed down to 4.5" x 4.5" square.
 - the LARGE HST is trimmed down to 7" x 7" square.

 Step 5.
Arrange the pieces of your block as shown in the photo below.

Step 6. 
Piece the top and bottom rows together, pressing all seams open.


Step 7.
Join the top row to the long sashing strip and press your seam open. Join the bottom row to the other side of the long sashing strip and press your seam open.


I've drawn up a few mock quilt layouts so you can see what sort of secondary patterns you can create with this block. This is what straight set blocks look like (in a 6x6 block quilt).


This is my favorite layout I think - in this one, alternate blocks have been rotated to create pinwheels.


As I mentioned at the beginning of the post, you can create an entirely different quilt by changing where you place the coloured fabrics. In this example, I've chosen coloured sashing fabric, but kept all the other fabrics neutral. By using textural prints (such as text fabrics or tone on tone greys) for the neutrals, I think you could create a gorgeous minimalist quilt.


The image below shows what this colouring of the block would look like when it's set straight into the quilt.

And this is the same as the second example above - where alternate blocks are rotated. I especially like the illusion of diamonds created within the neutral fabrics in this example.


I was so excited when I saw people starting to choose this block for their hive to make for them, and there are some fantastic examples of what you can do with this block if you search the #checkerblock tag on Instagram. I wanted to share a couple of my favorite quilts, as they're a great way to show you other options with this block.

This first version belongs to Michelle (@chelengeorge on Instagram), who asked her Bee Hive Swarm to make rainbow checker blocks. I think you'll agree this is a spectacular bee quilt :o).


THis second version is one of my all time favorite quilt. Patti (@retiredtoquilt on Instagram) used First of Infinity by Suzuko Koseki (one of my favorite designers!!) and changed around the colour placement which has produced an entirely different quilt. By using white solid for the sashing strips and the HSTs she has created a totally different look. It's nice to see that this block works really well with large scale prints, too!


If you do use this block I would LOVE to see it - please use the #checkerblock hashtag and tag me (@elvengardenquilts) so I can admire your work :o)

xx Jess