Pages

Thursday, 31 July 2014

Decipher Your Quilt - Circles


I have a very special guest post today, from my partner in quilt-deciphering crime, Leanne of She Can Quilt. Over the last few month 'real life' has gotten a bit busy for Leanne and I, and our Decipher Your Quilt posts have been put on the back burner. We hope to start our regular posts again on September 18, and to keep to a tighter schedule for the rest of the series.  

Leanne has put together an amazing post on circles this week. I consider Leanne a bit of an expert on circles - she has been working on a series of quilts (her Cycles series) over the last year or so, each of which involve lots of pieced circles. If you haven't seen these amazing quilts, I encourage you to go have a look. If you'd like to learn how to create blocks like Leanne has used, please read on for her fantastic tutorial on creating templates and piecing circle blocks. The rest of this post is written by Leanne.

For today, I am going to explain the math behind making a pieced circle block. We figured that it is fairly easy to identify a circle block, even a quarter or half circle block so today the focus is on the tools you need to make your own circle, any size and any time.
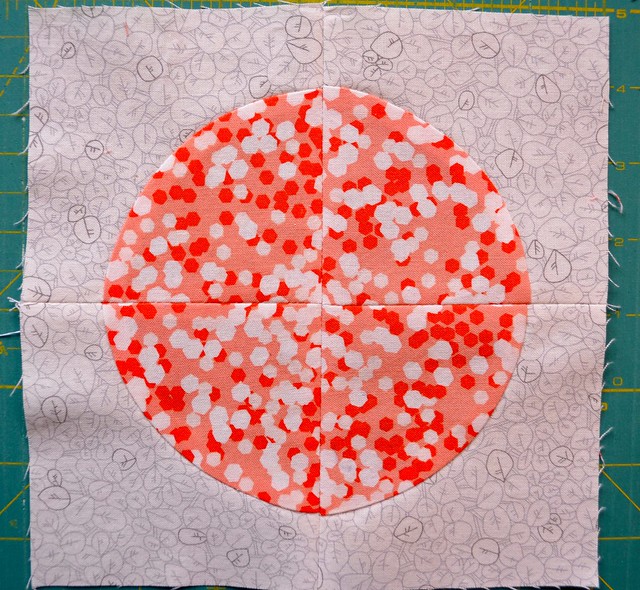
Circles - Decipher Your Quilt

***I have made several changes to this tutorial since I wrote it. A dedicated reader emailed me to point out a significant error, thank you! As a result, you will see two different sets of fabrics in the pictures, as I used the best of the photos for the finished tutorial. ***

There are many ways to add circles to your quilts using appliqué (regular, reversed, porthole style, etc.) and the math behind that is simple, make your circle and add it onto, or under, your work. However, when you are piecing circles, you need to understand how to figure out the seam allowances of the interior and exterior pieces.


First, decide what size you want the finished circle to be. For this example, I am going to piece a circle that is 6" in diameter when it is all finished (6" across its widest point, going through the middle).

To draw a 6" circle, I get out my compass (that silver gadget in the picture - they are available in geometry sets like the kind you buy for your kids most every year at the start of the school year). I open the compass so that the distance from the point to the pencil lead is 3" - the radius of the circle or half the diameter. I measure my compass on my cutting mat like you see above.

Now, if you don't have a compass there are some options:

  • Search your child's or your friend's child's school supplies to borrow one or go and buy one, they are very inexpensive and a good tool for quilters. For example, they are also helpful when drawing nice circles for appliqué.
  • Find a plate or pot lid or other circle in the size you want to work with.
  • Attach a string to a thumbtack on one end and a pencil on the other. Measure the distance from the point of the tack to the lead of the pencil, with the pencil standing up like the compass arm is standing.
  • Truly, a compass is easier and a good tool to have.
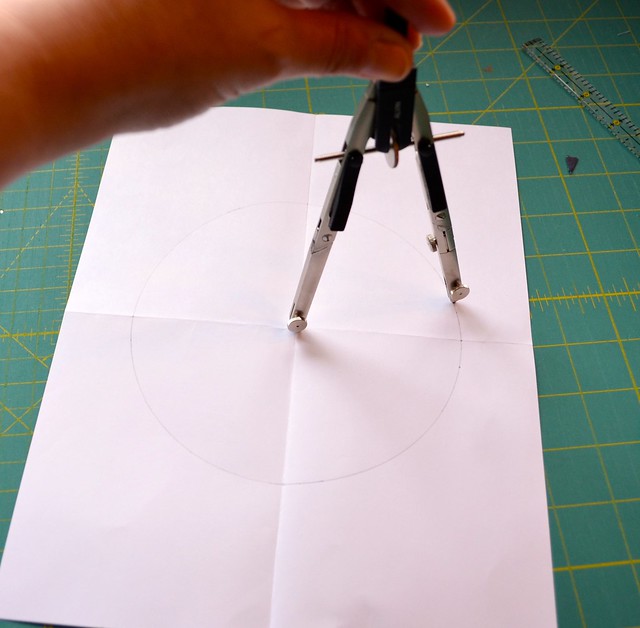

Circles - Decipher Your Quilt

Take a sheet of paper and fold it in half in one direction, open it and fold it in half in the other direction. Open it up so you have the folds as seen in the picture above. Place the compass point at the intersection of the folds and draw your circle which will have a 3" radius and 6" diameter.
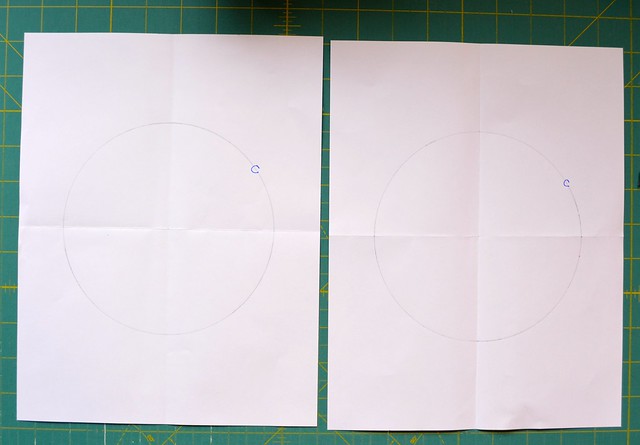
Circles - Decipher Your Quilt

Get a second sheet of paper and repeat. Mark this circle with a C, or write the word Circle with the C being right on the drawn line.
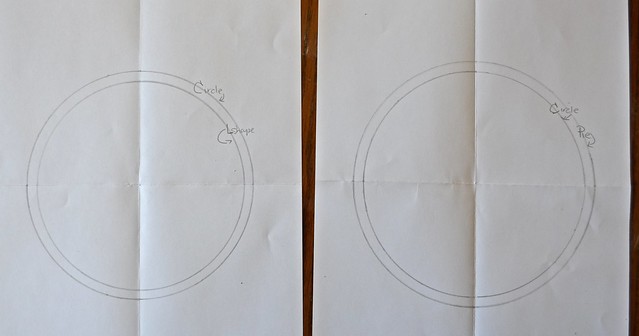
Circles - Decipher Your Quilt

Here is the tricky part. First, adjust your compass to a diameter that is 1/4'' larger then that of your first circle size. For our example that is to 3 1/4" . On one of the circles, place your compass point right at the same spot and draw the larger circle with the 1/4" longer diameter outside the first circle line. Mark that circle as the Pie.

Next, adjust your compass to a diameter that is 1/4'' smaller then that of your first circle. For our example that is to 2 3/4". On the other circle, place your compass point right at the same spot and draw the smaller circle with the 1/4" shorter diameter inside the first circle line. Mark that circle as the L shape.

[Note: if you did not find / buy that compass and you are using the string method, just remeasure your string length instead of adjusting the compass arms. If you are using the pot lid method, then measure 1/4" from your first circle line on either side and mark a number of those points. Once you have several points, free hand connect them to draw out the other circle.]
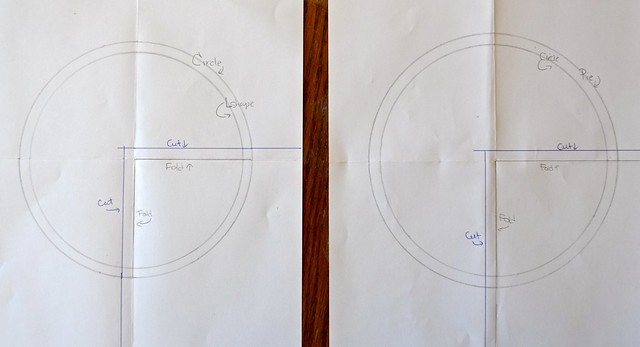
Circles - Decipher Your Quilt

For our example, I am making a pieced circle using what is known as the Drunkard's Path block, which is a quarter circle. The geometry you use to figure out the overlap is the same if you wanted to piece the circle whole or in halfs, but since I like to make circles in quarters, that is what I am showing.

Next we need to add the seam allowances that are needed to piece the 4 quadrants of the Drunkard's Path circle. Using your ruler, measure 1/4" out from both your fold lines on one quadrant of the markings on each piece of paper. You are adding 1/4" to the quadrant defined by the fold lines, so looking at the photo above, add 1/4" to the left of the fold line and 1/4" above the fold line to make the bottom right quadrant larger in each case by the seam allowances required. Label these lines as Cut and draw them out to the edge of your paper.

(*** This is the error I made in the first version of this tutorial. I forgot to add this seam allowance and a lovely reader pointed it out so that I could correct the tutorial.***)
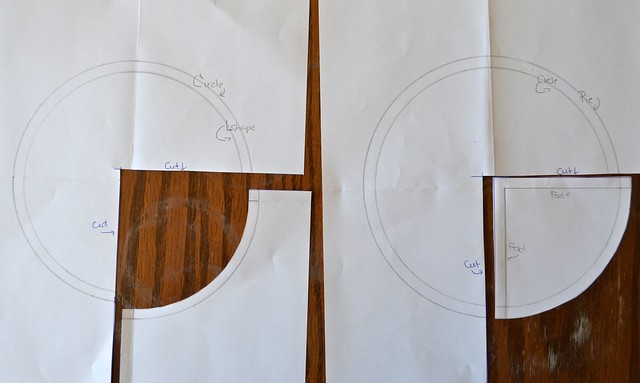
Circles - Decipher Your Quilt

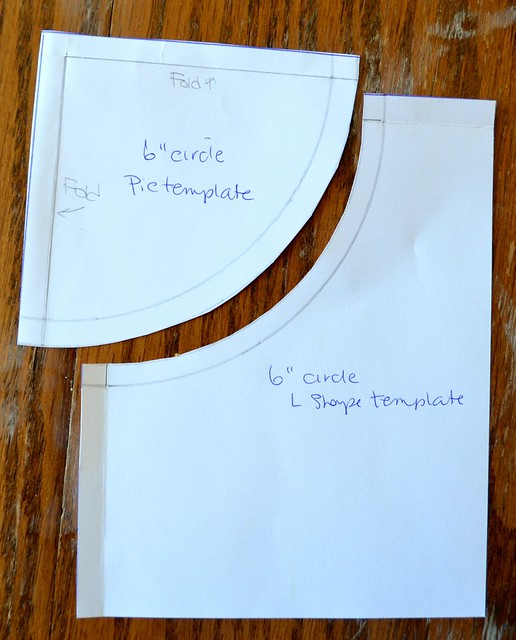
Then, using your "paper" scissors, cut the templates out of each circle, along the cut lines. On the one marked with a Pie line, cut the curve along that Pie line. On the one marked with the L shape line, cut along that L shape line. Both templates will have the original circle line also showing and if it is not, you have cut the wrong line and will have to draw it again.
Circles - Decipher Your Quilt

It is good to label the pieces now. Here is another tricky part and the key to the geometry and math behind piecing circles. Look at the Pie and the L Shape. They do NOT match up - the Pie shape looks longer at both ends and the curves don't fit together. If they match up, you made a mistake.
Circles - Decipher Your Quilt

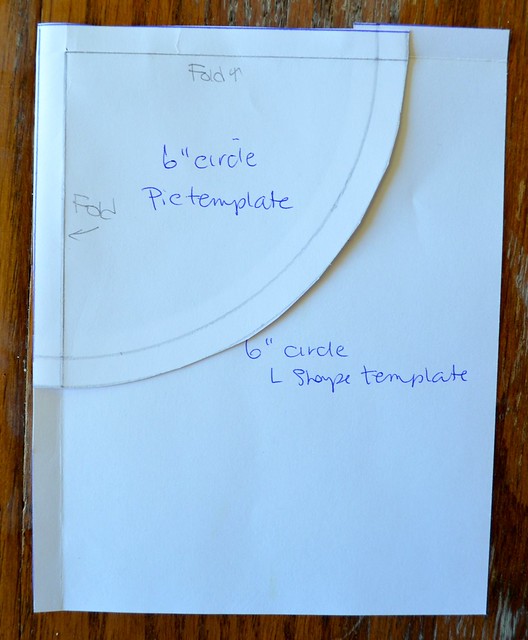
Look what happens if you overlap the two pieces along the first circle line - note that they are overlapping by 1/2". They match up now. The overlapping parts are the seam allowances for each side of the pieces you will sew together.
Circles - Decipher Your Quilt

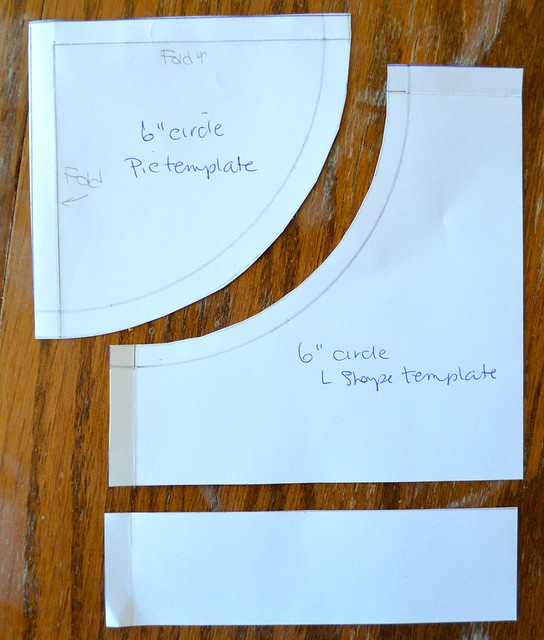
I like to trim my L shape template so that the width at the ends of the L is the same and I piece with a wider L shape than I need so that I have room for trimming.

In the photo I have trimmed the ends of the L shape to 1 1/4" because that is what fit on my paper. This is going to mean that I will end up with an 8 " unfinished block - 6" diameter circle plus 2 times 1" after seaming on each side. If you want the outside of the block to be bigger than what fits on your paper, just tape on more paper on the two straight edges of the L shape and trim to the size you want your block to be plus 1/2" for seam allowances.
Circles - Decipher Your Quilt

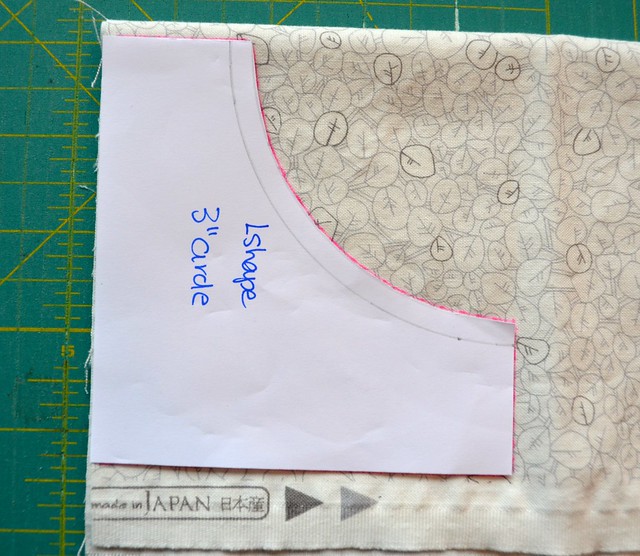
For a circle, you will need 4 L shapes and 4 Pie shapes. To save time, I generally fold my fabric into 4 layers so I can cut out all 4 of each piece at once. I trim one edge nice and straight. Lay your L shape onto the fabric with one of the lines along that nicely trimmed line. Since these are paper templates, DO NOT try to cut along them with a rotary cutter as your fingers will be in grave danger. Instead, get a marking pen or pencil and trace around the edge of the template.
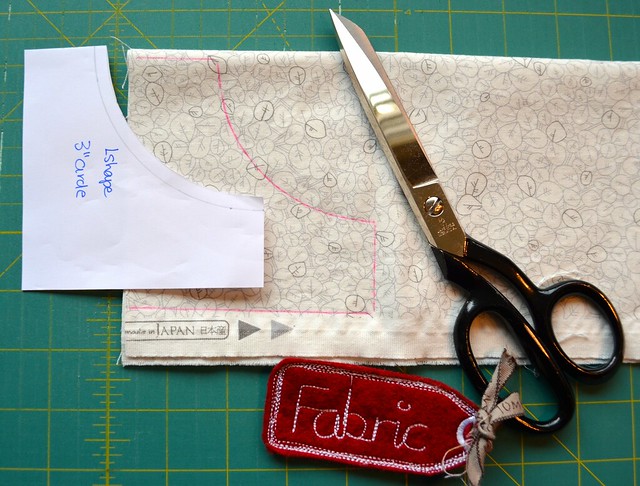
Circles - Decipher Your Quilt

Then holding all four layers together carefully so they don't shift as you cut, and using your fabric scissors, cut out the fabric along the traced lines. (Isn't that fabric tag lovely, it was a prize from the wonderful Benta and it keeps my entire family from wrecking these lovely sharp scissors.)
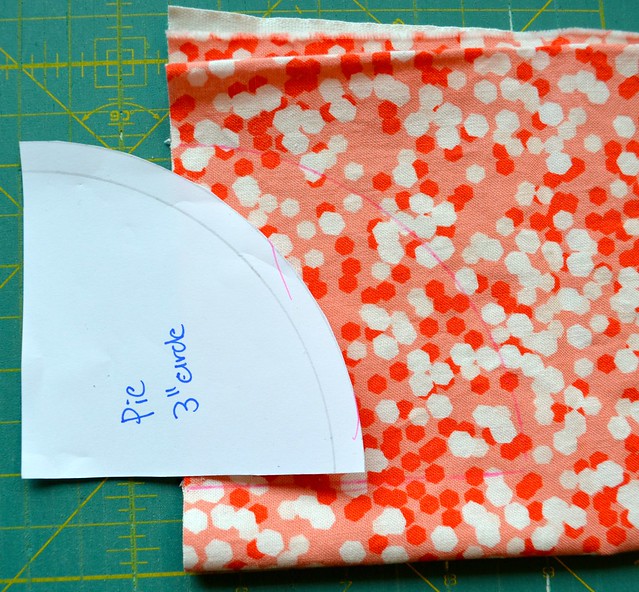
Circles - Decipher Your Quilt

Repeat the same procedure for the Pie shaped template.
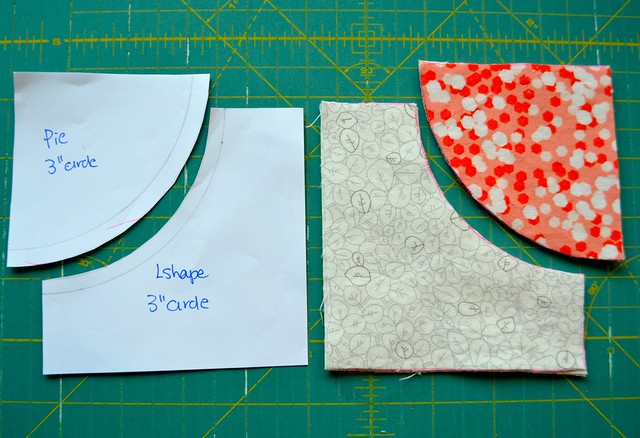
Circles - Decipher Your Quilt

You can see that it seems unlikely that this is going to work out.
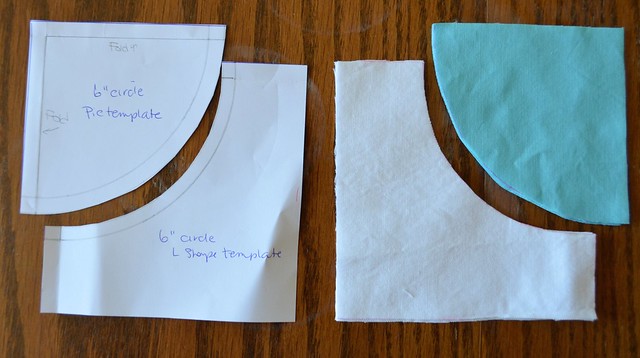
Circles - Decipher Your Quilt

Even when you cut the fabrics with the correct templates, it still looks like an unlikely proposition.
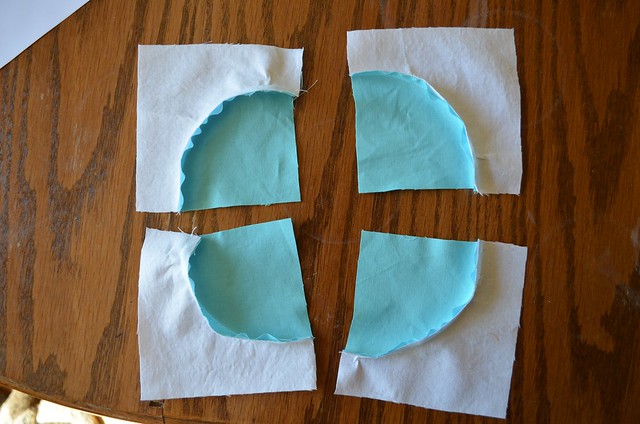
Circles - Decipher Your Quilt

Piece the Pie shapes to the L shapes. There are many ways to do this, with pins, without pins, with one pin, with glue basting, and with special sewing machine feet. I recommend that you watch my 1 minute 18 second video which is referenced in the blog post here and give my no pins, no fancy equipment, method a chance. Most folks who do are chain piecing these circles in no time. However, if you google piecing drunkards path circles, you will find many helpful tutorials for every possible piecing method and find the one that works best for you.
Circles - Decipher Your Quilt

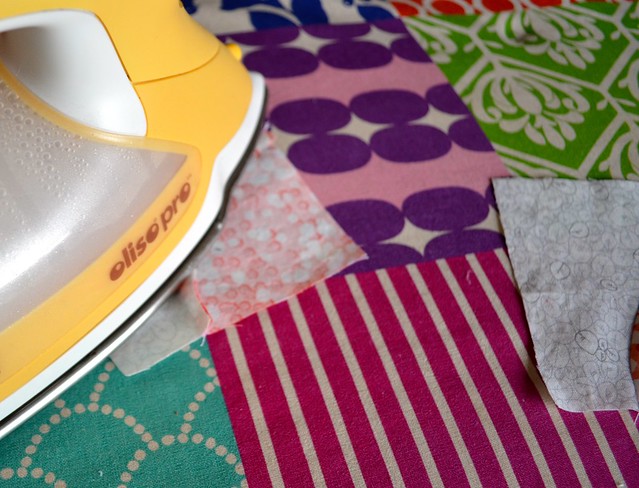
Remember that you cut both the L shapes and the Pie shapes on a curve so those are bias cuts. The pieces will easily stretch along them. Press them gently and carefully. I press the back seam towards the Pie shape.
Circles - Decipher Your Quilt

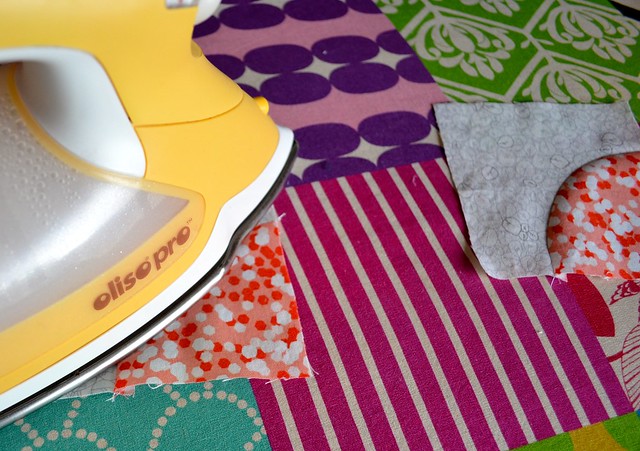
Press the front carefully too, watching to avoid any bulking up along the sewing line.

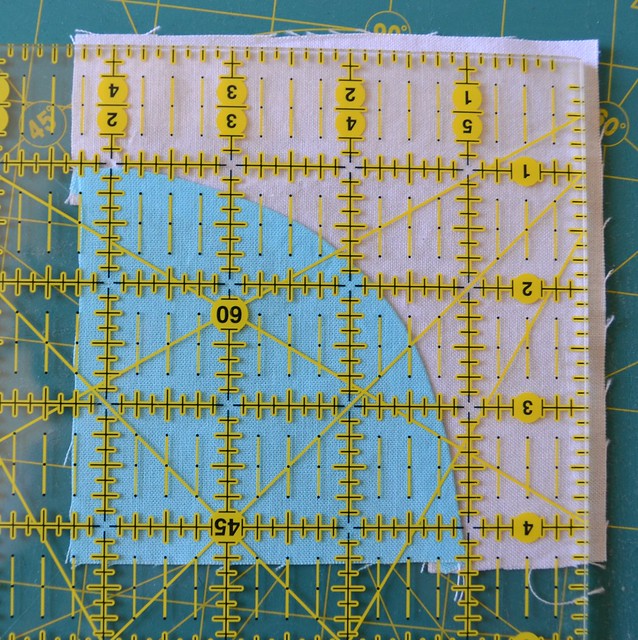
Now, when you do a lot of these, eventually you are able to piece them without much, if any, need for trimming. But, like making HSTs, the pieces benefit from some trimming, especially if you started with larger L shapes than you needed. I decided to trim these pieces to become 4 1/4" squares, again so that my unfinished final block would be 8". [Note: if you want the L shape to disappear at the edges of the circles, you would trim the L shape to be just 1/4" at the two ends of the L.]
Circles - Decipher Your Quilt

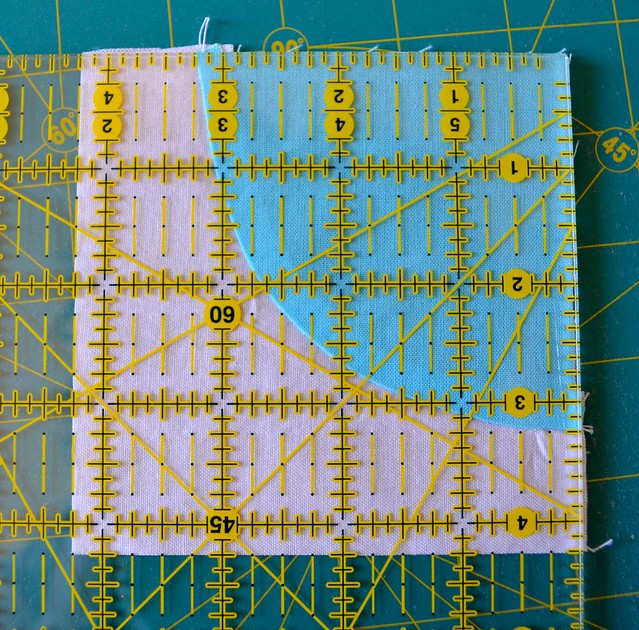
Here is another tricky part. Watch the placement of your trimming ruler so that the radius is not shortened by this step. We had a 3" radius for the original circle we drew and we added 1/4" for the seam allowance. That first circle line we drew was the stitching line.

Look at the photo above. As we need 3 1/4" of radius - blue fabric - for the pie shape, place the ruler so that both of the two ends of the blue pie shape are 1" in from the edge of the L Shape. Then make sure that there is 3 1/4" of blue available to trim at the corner of the pie shape. Trim off the excess L shape fabric.
Circles - Decipher Your Quilt

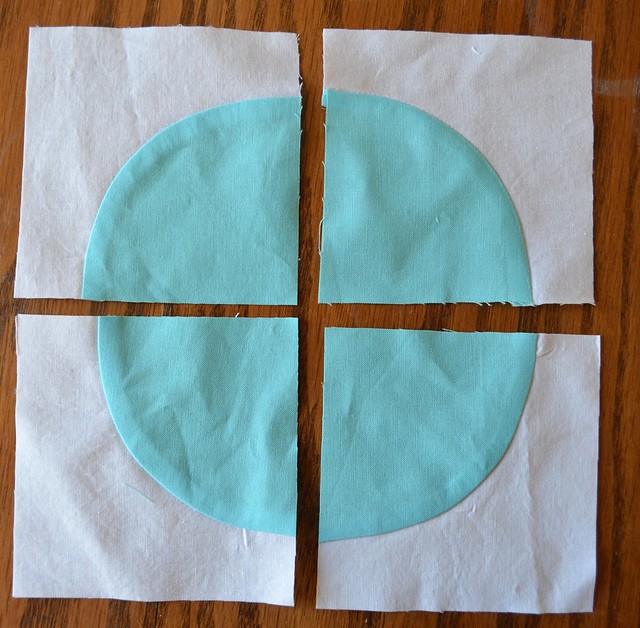
Flip this unit over to trim the other side. Line up the outside of the L shape to the 4 1/4" marks, note that the ends of the pie shape both hit the 3 1/4" mark, and then trim the two outside edges.
Circles - Decipher Your Quilt

Repeat for all 4 quarter circle units.
Circles - Decipher Your Quilt

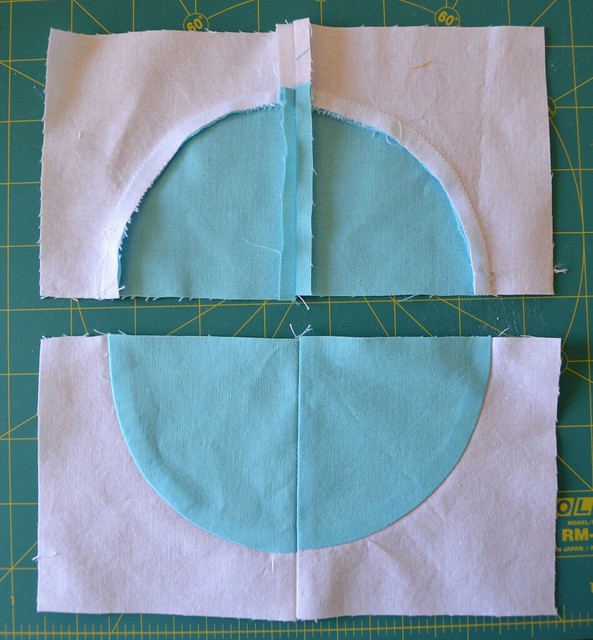
Piece two quarters together and repeat. I press the seams of circles open and it is worth stopping to press at this point.
Circles - Decipher Your Quilt

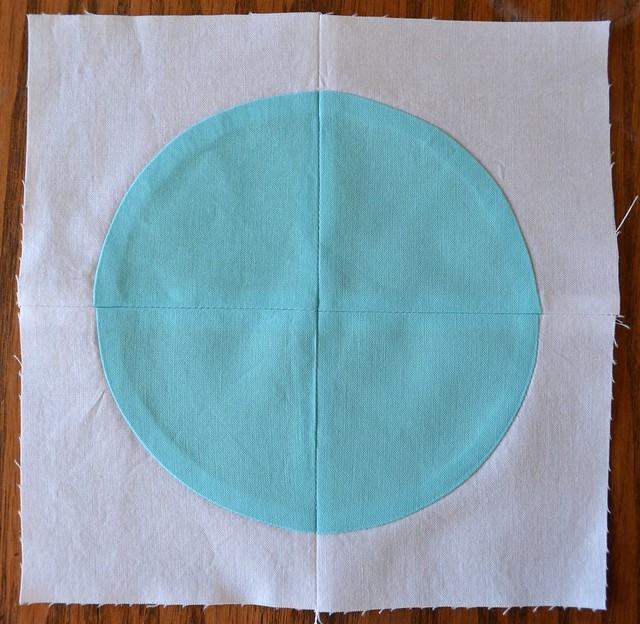
Piece together the two halves of the circle. I generally match the seams at the centre of the circle in priority to matching the edges, although I try my best to get them both to match and ease a little as I sew the seam if need be. You can see from this sample that the seams are not perfect but they are very close. Once the quilt is quilted, this amount of imperfection generally is not noticeable and it is totally gone after washing. If you are bothered, sew a short basting stitch at the edges where the edges of the circle meet, then line up the middle seams and ease any bulk in as you go.

There you have it, the geometry and math behind pieced circles. Now you can make one any size, without any instructions or anyone else's templates. Before you say, I can't, or it does not make sense, consider giving this a try, just as I have written it out. Some of this geometry is better understood once you actually do it once or twice before you ask too much. And then let me know all your questions. If there are lots, I will do a follow up post addressing them.

I also assure you that sewing these curves gets easier quickly if you just practice a little, so don't let the curved piecing stand in your way from adding pieced circles into your quilt.

A huge thanks to Leanne for letting me post this here!

xx Jess

Tuesday, 29 July 2014

Block Flower Pattern Release (and Giveaway!)

Since showing you my Block Flower quilt a few months ago, I've had a wonderful group of quilters testing the pattern for me - and I'm delighted to say it is now available to buy in my Craftsy shop! It will be available at a special introductory price (50% off) for the first two weeks :o)


The 10 page pattern includes full instructions and diagrams to make a 78" x 78" square quilt. It is a fat quarter friendly pattern, and is perfect for using large scale prints. It is a beginner friendly pattern, but would also be a fun and quick quilt for more experienced quilters to put together. 

I absolutely love seeing what other people do with my patterns, so it has been really exciting seeing how each of my testers have interpreted the pattern and made it their own. I think the range of quilts they have produced really shows how versatile this pattern is. 

Leslie (aka @iheartdl on Instagram) made her version using these fabulous Charley Harper fabrics. I love how she has used colored background for the blocks, it gives the quilt a completely different look! 


Karen (aka @peaceloveandquilts on Instagram) made her version using loads of Denyse Schmidt prints. I love the colours she has chosen, and the fact that she has used a variety of colours for the low volume backgrounds. 


I had to include this little mosaic of Karen's daughter playing around during the photo shoot, too. It's refreshing to know I'm not alone in chasing children away from carefully posed quilts ;o)


My gorgeous friend Ella (who blogs at Throw a Wench in the Works) made her quilt using solids in cool colours, paired with white background and beige sashing. I love how calm and soothing this quilt is, and the fact that Ella made this as a charity quilt :o)


My friend Serena (who blogs at Sew Giving) did an incredible job with her version. Serena chose to use dark sashing within the blocks as well as the between them, and use the same dark grey for the accent HSTs - and it has given the whole quilt a completely different and really striking look. I really love this version. 


And finally the lovely Leanne (who blogs at Daisy and Jack) made her version using Nouvelle by Art Gallery Fabrics. I love how feminine and pretty Leanne's version is :o) 


A huge, huge thanks to all my testers for doing such a brilliant job. Each of these ladies will be offering a pattern giveaway in the near future, so be sure to hop on over to their blog or IG account if you'd like to win a copy!

I'm also offering up a copy of my pattern as a giveaway today. If you'd like to enter, please just leave a comment and I'll draw a winner at the beginning of next week. If you buy a copy of the pattern and end up winning, I will refund you :o)

If you are a no-reply blogger, please make sure you leave your email address - if I can't contact you, I will have to redraw. I have been recieving a LOT of no-reply comments lately - if you haven't heard a reply from me, it is probably because I can't. My friend Adrianne has a great tutorial for how to fix this :o)

I will have another pattern release later this week (my ROundabout pattern), so stay tuned for that one too!!

xx Jess

Friday, 25 July 2014

Foxy lady

A few weeks ago, I had the opportunity to do a workshop with the uber talented (and utterly hilarious) Jodie Carleton, the genius behind RicRac soft toy patterns. It was an absolutely brilliant day; fascinating conversation (embroidered knickers anyone?) and lots and lots of laughs thanks to Jodie's fabulous (and slightly twisted) sense of humour.

We were making foxes using Jodie's Ginger and Blue pattern. Although all three of my kids declared they would love one, I decided to make the wee one hers first - and obviously she wanted a girl. THis little fox is yet to be named (we come up with really creative names like 'foxy' in our house most of the time), but she has been played with almost everyday (to the point that I need to re-attach her tail) :o)


There are so many features I love in this pattern - but the tail design really takes the cake. Jodie has designed this so cleverly, so that the weight of the tail allows the fox to sit up without toppling over. She is made with wool felt, and the arms and legs are jointed with buttons.


I had a small spool of aqua Aurifil wool thread so I decided to blanket stitch the edges of the dress rather than machine stitch the edges.


She's not perfect - but she is well loved, and I had a lot of fun putting her together so I'm calling it a win ;o)

I'm at the Hobart Craft Show over the next three days, teaching a little applique and embroidery project at 11am each day (it will be a fun class if you're local!). It's running alongside Island Quilts (the Tasmanian Quilt Guild exhibition) and four of my quilts are hanging, so I will try to get photos over the weekend if I'm allowed.

xx Jess

Thursday, 24 July 2014

Pay it forward

I had a completely unexpected parcel arrive in my letter box last week, right in the middle of a very crap week. It's funny how these things happen at the perfect time - and there is seriously nothing better than a beautiful handmade gift. 

There were a flurry of Pay it Forward posts happening last year, one of which was put up by Erin of Billy Button Designs and I was lucky enough to get my name in the list. I had totally forgotten I'd signed up for it, so when I unwrapped the parcel to find this beautiful sewing kit I was beyond thrilled. The kit is just fabulous - and Erin included a bunch of fabulous extras, including those awesome covered buttons and tape measure at the top. Thanks SO much Erin, I absolutely adore it!  


So it's now my turn to pay it forward! If you would like to receive a little handmade something (cushion cover, pouch, mug rug, something like that) within the next twelve months, just leave a comment on this post and I will choose three random commenters in a week or so. Please make sure you aren't a no-reply blogger though - if I can't contact you I will have to draw a different commenter :o) 

There are a few rules to keep in mind: 

1. By commenting, you are committing to take part in the fun of in Pay It Forward yourself by making something for 3 readers of your blog.

2. You must have a blog to take part.

3.  You need to post about Pay It Forward on your blog once you receive your little something so as to keep the fun going
.

So, would you like to play along? If you do, maybe let me know what sort of handmade something would appeal to you ;o)

xx Jess


Tuesday, 22 July 2014

Free Motion QAL - Piecing Your Quilt Top

Welcome to the second week in the Free Motion QAL! I hope you all enjoyed the excellent FMQ advice offered by Jen, Pat and Renee last week, and are really pumped to get started :o) Even if you're not participating in the QAL, it is well worth reading through each of the advice posts (here, here and here) - there are SO many tips and tricks offered by these ladies. 

One other thing I need to mention is that I may need you to be a little patient with me over the next couple of months of the QAL. My partner has a slipped disc in his neck, and will be having surgery next week (with six weeks recovery) - so I'm pretty stressed out at the moment, and I can't guarantee I will be able to get all of the posts up according to the schedule. I will try my best to get all the posts up on time, but please bear with me if they are a little late sometimes.

So, this week I will be talking very briefly about putting your quilt top together. There isn't much I can add that isn't included in the pattern - but I would suggest making use of the colouring sheet included in the pattern to decide on the layout of your five coloured stripes. I am giving everyone two weeks to get the quilt top together, and then I'll be back in two weeks to talk about basting your quilt. 

This is my in-progress quilt up on the design wall - I am having an absolute ball putting this together. I know I've mentioned it before, but the Cotton Couture I'm using is an absolute dream to sew with - the hand is incredibly soft and I'm anticipating it will be amazing fabric to quilt.


This is a very quick and simple top to put together - the hardest part is making sure you don't mess up the order of each row. I tend to tackle each row separately - so I sew each row together, put it back up on the design wall before dealing with the next one. I know some people can chain piece all their rows at the same time and get everything right - but I've learnt from experience I'm not one of these people. So to avoid ripping more seams than I sew, I play it safe and do it one row at a time :o) 

It's taken me a while to get organised, but I've started a Flickr group for the QAL - so please feel free to share your progress (and questions) over there. Starting with the next QAL post, I will be adding a linky party to each post, so you can share your progress here as well. If you are on Instagram, please use the hashtag #freemotionqal. 

xx Jess 

Saturday, 19 July 2014

Free Motion Quilting Advice - Jen from Quilter in the Closet

I'm thrilled to introduce Jen (who blogs at Quilter in the Closet) to share the final free motion quilting advice guest post. I 'met' Jen a long time ago, and am constantly inspired by her work. Jen actually pattern tested my Giant Chevron pattern last year, and the way she quilted hers has partly inspired this QAL. Thanks so much for such an excellent post, Jen!

Hi there!  First, a big thank you to Jess for thinking of me when looking for a guest post.  I still consider myself a novice at best, but I've learned a lot and I am happy to share what I've learned.  Whole books have been written on the subject, so I just focused on a few things.

Doll quilt finish

I really only started doing my own FMQ in 2012, when I found the Free Motion Quilting Challenge at Insights from SewCalGal.  The FMQ challenge was fabulous!  Each month a new expert in FMQ would provide a fresh lesson, and participants would give them a try.  Some of the lessons are still available; click HERE to be directed to the links from SewCalGal, you might have to scroll down a little but they are worth it.

baby quilt close up

I can honestly say that just the act of practicing FMQ each month was the biggest boost to my skill.  I don't think it matters what design you are attempting, just the act of practicing makes you better.  Seriously the biggest challenge is just deciding to give it a try.  Be fearless!  What is the worst that can happen?

Pillow shams


Practice Sandwiches

I know Pat has already mentioned practice sandwiches, but they are a big part of my preparation for quilting.  When I was learning FMQ, I chose to make place mat sized sandwiches for the FMQ challenge.  They were big enough to allow me time to figure out the lesson on fabric, but small enough to be easy to manage under the machine.  They are also big enough to have something to hold on to while you are trying out a design, but not so big that you feel like you are wasting fabric if it all goes wrong.  Plus, unless your cooking is truly terrible, no one will be studying your place mat in detail.  Here are some of the place mats I created during the challenge.

FMQ place mats

I now use smaller practice sandwiches.  My standard is a 10 x 10 black layer cake square, 2 layers of batting (because that is what I like to use in my quilts), and some scrap fabric on the back (a great use of questionable quality fabric that you got in a swap).  Before I start stitching on any quilt, I pull out a practice sandwich and the thread I want to use on my quilt and start quilting.  If the design I am going to use is small, I will stitch it on my practice sandwich.   If it is large or complex, I might just stitch my favorite swirls to remind my muscles what to do, get my tension right, and figure out if today is a good day for quilting (some days I'm just plain too tired or distracted).  If all is going well at the end of my practice sandwich, I will move on to my quilt.

Practice sandwiches also give you an opportunity (off quilt) to try out new designs or threads, and regulate your speed.  Speed is something that will be different for everyone.  Personally, I like to really pedal to the metal; however, it is not the speed that works best for me.  If I quilt too fast, I tend to jerk the quilt around a bit, making large stitches in a sea of smaller stitches.  If I quilt too slowly, all my stitches are super tiny.  I found out through practice that somewhere between medium and high yields my best results.

I feel it is important to note that at some point you have to "just do it" and try your hands on a real quilt.  Practice sandwiches are great, but there is nothing that will build your muscle memory like completing an entire quilt.  You will notice a difference from the spot you start to the spot you finish.  Don't stress though, it is still perfectly cuddle-able and you should be proud to give it as gift if that is what you intended the quilt for.

Threads and Needles 

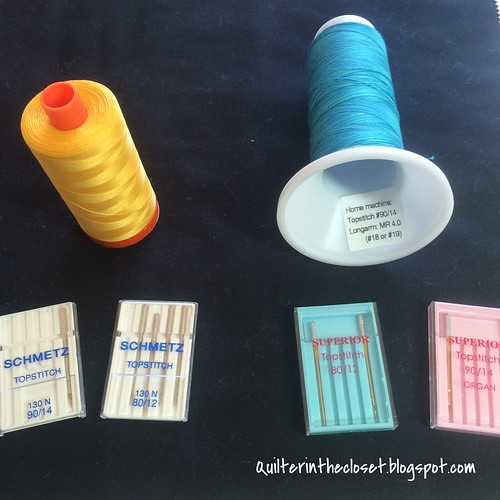
I mostly use Aurifil or Superior Threads for my quilting now.  The path to those choices wasn't smooth.  I was trying to finish a quilt up for charity using a simple meandering design and my gorgeous variegated Superior Thread that matched the quilt perfectly, kept breaking.  I am not exaggerating when I say I could only stitch about 6 to 8 inches before the thread would break.  I was at my wits end!  I went through the list from the experts of what to try, and it was still breaking.  I finally broke out a pack of Superior needles (that I was saving for some reason) and gave them a try.  No more problem!  Superior Threads even tells you on the bottom of their spools what size needle to use.

Needles and thread


I had a similar problem with Aurifil threads.  I had started using those Superior needles for all my quilting, and when I tried out Aurifil, it kept breaking.  Again, I was at my wits end.  Everyone raved about this thread, and I had bought a LOT of it.  It pieced nicely, but maybe the stress of FMQ was too much??  On a whim, I switched back to the Schmetz needles I had.  No more breakage.  Go figure!  It was only through trial and error that I figured that all out.  -- on a side note, the Gutermann thread I started my quilting journey with years ago, never broke, regardless of the needle used.

I read recently that ball-point needles should be used for quilting.  I haven't had the chance to try them out yet, but plan to.  They might just be what works for you.

Tension

It can really be nerve-racking trying to get tension right.  Use your practice sandwich to get an initial tension level, but check the underside of your quilt frequently AND any time you change a bobbin, re-thread your machine, change a needle, etc.  I know you want to just get going and finish, but a few stitches is easy to rip out - a whole quilt full, not so much.

checking tension on the bottom


One of the biggest tips I can give someone new to FMQ is to use the same color thread in your top and bobbin.  It won't solve every tension issue (eyelashing for example), but it will give you a slightly wider range of acceptable tension levels.  For example, (usually)my machine likes to quilt on or around 3.5 for most quilts I make.  If I have a different color thread on the bottom (maybe I wanted to blend with my backing), I will need to adjust my tension to find that sweet spot, almost exactly, otherwise you will see little dots of the wrong color either on the top or bottom of my quilt.  Whereas, if I use the same color thread, I could have my tension set anywhere from 2.5 to 5, and you wouldn't see the difference!  That's huge!  Especially for someone just starting out.


Have a Game Plan for your Quilt

All I mean by this is, think about what design you are going to do, and where you need to start your stitching.  If possible, your game plan should allow for the least amount of quilt in your throat space.  You don't want to start on the left side of your quilt and have the entire thing bunched up in your throat space; it's not impossible, just uncomfortable.

If you are going to do an all over pattern, or the same design in all the negative space in your quilt, I would probably start in the dead center of my quilt (in a seam so as to hide my starting stitches) and quilt the lower right quadrant of my quilt (pretend your quilt is divided in 4 quarters).  I would then work my way, by quadrant around the quilt.  This big quilt was quilted that way.  I worked on 9 blocks at a time.

Helpers turned models (Gigantor quilt)

If my plan was to quilt each block differently, then I would probably start with the blocks near the center and work my way out.

HFWYG quilt top 1.2

In the case of Jess's pattern.  I started by quilting the center (red) stripe, turning my quilt when the chevron turned, and then worked my way out from the center by stripe.

Giant Chevron closer up


I could also go on and on about the benefits of stitching all your seams in the ditch before you start FMQ, but THAT might be going too far for this guest post.  (Experiment with it, just saying!)

So to recap my best FMQ tips:

  • Just go for it and don't stress
  • Practice - it takes time and practice to improve
  • Match your top and bobbin thread
  • Have a quilting plan


Thanks again, Jess, for the invitation to share some tips.  I look forward to seeing everyone's FMQ in this QAL.

Jen


Friday, 18 July 2014

Free Motion Quilting Advice - Renee from Quilts of a Feather

Today's guest post is from the super talented Renee, who blogs at Quilts of a Feather. I'm not sure when I discovered Renee's blog, but it is a constant source of inspiration. Thanks so much for putting together such a fabulous post!

Hello!  My name is Renee, I blog over at Quilts of a Feather (@quiltsnkids on IG).  I've been quilting for about 5 years now, and free motion quilting continues to be my favorite part.  I quilt on a Janome MC6300, which does not have a stitch regulator.

Let me start with my setup. I think it's important to have good setup because then you can more easily make consistent stitches and smooth quilting lines!

I always use quilting gloves and a Supreme Slider for FMQ.  The gloves give me really good grip on the quilt (which decreases stress and fatigue in my hands, arms and shoulders!) while the slider prevents the quilt from bunching up, and decreases drag/friction on the table.  It makes a huge difference!  The bottom of the slider collects dust and lint (which decreases it's stickiness, which can cause it to shift while I'm quilting=bad), so after a few uses I rinse it with cool water and let it air dry.

Machingers gloves and Supreme Slider.

I quilt with barefeet (or with just socks in the winter), which helps me better feel how much I am depressing the sewing machine pedal.  You can also see in the photo how I put the pedal in the middle of my foot, with my toes kind of hanging off.  That gives me a lot better control over the speed of my machine--I can more accurately feel how much I am depressing the pedal.

Quilting barefoot!

 Another thing to note is that my other foot is flat on the floor.  It really helps me to keep it on the floor, but often it finds it's way onto the foot of my chair, or the foot of the table--which decreases my control and throws off my posture.

In the next photos you can see how I place my hands and elbows.

Elbows resting on the table for smaller quilts.

I keep my hands open, and mostly quilt within the space between my hands, especially for smaller/tighter quilting patterns.

Working on swirls and McTavishing.

Now let's talk about quilting!  The best thing you can do is practice, practice, practice.  Experiment with how much you push down on the sewing machine pedal and how fast you move the quilt--the goal is to find a good balance between how fast you move the quilt around with how hard you push down on the sewing machine pedal.

I like using mini quilts from muslin or scraps, or orphan blocks that are around 12-18" square--this gives me plenty of room for my hands to be on the quilt, but doesn't bunch up under the machine.

Stitches fairly uniform in size!

 Ideally our hands move the quilt at a speed that is proportional to how much we push down on the pedal with our foot.  By proportional I mean that when you are moving the quilt slowly, you are only pushing on the pedal a little (slow stitches), and when you move the quilt faster you are also pushing down more on the pedal (fast stitches).

When your hands and pedal-foot work proportionally to each other, your stitches will all be the same size.  Sometimes that is tiny and sometimes that is large--it doesn't really matter, what's most important is that they are all the same!

Stitches on the left are pretty uniform and a good size for me, but on the right they got larger--which means I was moving the quilt too fast in that area.

But when they aren't consistent it means that your hands and feet aren't communicating properly.  You can see some issues in this photo:

The red circle shows where the stitches are too big (compared to most of the others) and the yellow shows where they are too small.

The inconsistent stitches happen for lots of different reasons, here are my top reasons:
1. You don't know where to move the quilt next, so your hands slow down (tiny stitches).
2. You do know where to move your quilt and move it too fast (big stitches).
3. Your quilt snags on something (mine will get pinned between my tummy and the table, or pinched between tables, or a pin will catch on the sewing machine)--and then you get tiny stitches, often followed by big stitches when the quilt is suddenly freed.
4. If you stop and then start again on a smooth line, you can sometimes cause some awkward stitches:

The yellow circle shows a spot where I stopped (needle down) and then restarted--a small hiccup in the smooth line and a few tiny stitches before I got back into my rhythm. 

I can usually avoid these little hiccups in smooth lines of quilting by only stopping and starting where there is already some stitching--so on the photo above it would be on the stem, or where the quilting lines cross.  If nothing else the other stitches in those areas hide the little hiccup.

But if I really need to stop mid-smooth line, I've found it helps a lot to do a couple of stitches in the same spot when I start again.  That seems to help my hands and feet sync up again.

My last piece of advice is to remember the bigger picture!  Here's the finished quilt from the above photos:

Butterfly Mini Quilt II

I showed you several mistakes on that quilt, but now that you see the whole thing they are really hard to find!  And most people will never notice the stitches that are too big or too small.

I hope some of this information helps!  It is a hard thing to teach over the internet with so many variables!